Showing posts with label Security. Show all posts

Friday, 22 April 2016

Verify the integrity of downloaded ISO files


You should always verify any downloaded ISO file. The reason is that the file may have been maliciously modified by a hacker and can install malware like backdoors, keyloggers etc into your computers.

The ISO file is signed using the private key to create a digital signature. The public key is used to verify the signature. The digital signature file is used to verify the ISO file.

This verifies that the file has been created by the owner himself, since nobody else has his private key. Also, it verifies that the file has not been modified or tampered in any way. 

1) Download the ISO file.

[shabbir@block1 Downloads]$ wget https://github.com/Security-Onion-Solutions/security-onion/releases/download/v14.04.4.1/securityonion-14.04.4.1.iso


2) Download the digital signature for the above downloaded ISO file.

[shabbir@block1 Downloads]$ wget https://github.com/Security-Onion-Solutions/security-onion/raw/master/securityonion-14.04.4.1.iso.sig


3) Download the public key.

[shabbir@block1 Downloads]$ wget https://raw.githubusercontent.com/Security-Onion-Solutions/security-onion/master/KEYS

4) Import the public key in your public keyring.
[shabbir@block1 Downloads]$ gpg --import KEYS

5) View your public keyring
[shabbir@block1 Downloads]$ gpg2 --list-keys
/home/shabbir/.gnupg/pubring.gpg
--------------------------------
pub   4096R/ED6CF680 2012-06-29
uid                  Doug Burks <doug.burks@gmail.com>
sub   4096R/C5D9F4EB 2012-06-29


6) Verify the ISO file using the signature file.
[shabbir@block1 Downloads]$ gpg --verify securityonion-14.04.4.1.iso.sig securityonion-14.04.4.1.iso
gpg: Signature made Sat 19 Mar 2016 05:32:50 PM IST using RSA key ID ED6CF680
gpg: Good signature from "Doug Burks <doug.burks@gmail.com>"

gpg: WARNING: This key is not certified with a trusted signature!
gpg:          There is no indication that the signature belongs to the owner.
Primary key fingerprint: BD56 2813 E345 A068 5FBB  91D3 788F 62F8 ED6C F680


Wednesday, 20 April 2016

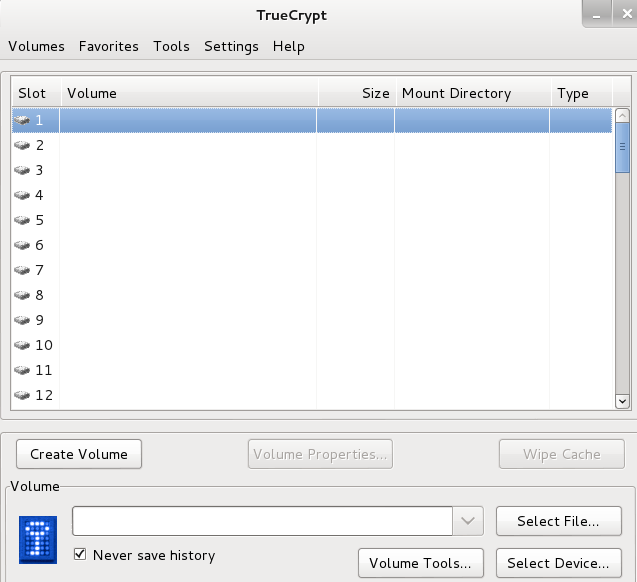
Creating Encrypted volumes using Truecrypt in Kali Linux

TrueCrypt is a software for establishing and maintaining on the fly encrypted volumes. On the fly encryption means the data is automatically encrypted before it is saved and decrypted before it is loaded without user intervention.

1) Open TrueCrypt
root@kali:~# truecrypt

A Gui window will open

2)Click on Create Volume.


3)Select option Create an encrypted file container as shown below.


This option creates a container containing encrypted files. This files can be of any type as long as they are in conatiner they are encrypted

4)Select the option Standard TrueCrypt volume.

5)Specify the location for the container
               /root/Desktop/try

6)Specify the encryption standard.

7)Select the size of volume you want.
        It displays free space below the box used to specify size


8) Set password for encryption.

9) Select Filesystem you want on that volume

10) Select I will mount th evolume only on linux

11) Click on format

//Mount Volume to use it to create files and directories
 1)Select one of the slot in the list and select file volume file


 2) Click on Mount to mount this volume

3)now from terminal acess this volumeor u can use GUI
            root@kali:~# df
Filesystem             1K-blocks    Used Available Use% Mounted on
rootfs                  11459808 9637072   1217552  89% /
udev                       10240       0     10240   0% /dev
tmpfs                     102488     508    101980   1% /run
/dev/mapper/kali-root   11459808 9637072   1217552  89% /
tmpfs                       5120       0      5120   0% /run/lock
tmpfs                     204960      84    204876   1% /run/shm
/dev/sda1                 233191   26050    194700  12% /boot
/dev/mapper/truecrypt1     30356     430     27436   2% /media/truecrypt1

4) Change directory to /media/truecrypt1 and create files and directories
                root@kali:~# cd /media/truecrypt1/
                   root@kali:/media/truecrypt1# mkdir first
                   root@kali:/media/truecrypt1/first# touch foo1

5) unmount volumes using terminal or Gui
          1) For Gui Click on Dismount in Truecrypt
          2) For Terminal goto root directory and unmount truecrypt1
                      root@kali:/# umount /media/truecrypt1


Tuesday, 9 June 2015

Host based IDS: Tripwire in RHEL7


Host-based IDSes mainly rely on integrity checking. Integrity checking involves the creation of a protected database of checksums, hashes, and other attributes of a host's critical system files. The integrity checker periodically checks those files against the database. if a file has changed, an alert is logged. Both Tripwire and AIDE are utilities used to monitor the integrity of files. They both create a secure password protected database of file and directory attributes that is used to compare against the current files and directories for changes. If files being monitored are modified in any way, Tripwire and AIDE will notify administrators.

We will install and configure tripwire on the following machine:

Server name         :meru.mycompany.com
Server IP Address: 192.168.122.1

Perform the following steps:
 
1) Install tripwire.
1.1) Install EPEL repository.
[root@server1 ~]# yum install epel-release

1.2) Install tripwire from the EPEL repository.
[root@meru ~]# yum --disablerepo=\* --enablerepo=epel install tripwire


2) Create site and local passphrase.
The site passphrase is used to encrypt and sign the Tripwire configuration and policy files. The local passphrase is used to encrypt and sign Tripwire's databases and reports. 

2.1) Create site passphrase 'site.key'.
[root@meru ~]# cd /etc/tripwire/
[root@meru tripwire]# twadmin --generate-keys --site-keyfile site.key
Enter the site keyfile passphrase: 
Verify the site keyfile passphrase:
Generating key (this may take several minutes)...
Key generation complete.


2.2) Create local passphrase 'meru.mycompany.com-local.key'.(In our case $HOSTNAME will expand to 'meru.mycompany.com')
[root@meru tripwire]# twadmin --generate-keys --local-keyfile $HOSTNAME-local.key
Enter the local keyfile passphrase:
Verify the local keyfile passphrase:
Generating key (this may take several minutes)...
Key generation complete.


2.3) View the generated passphrases.
[root@meru tripwire]# ls
meru.mycompany.com-local.key  site.key  twcfg.txt  twpol.txt


3) View and edit configuration and policy file. 
The configuration file 'twcfg.txt' controls basic characteristics of tripwire's environment and behavior. The Policy file 'twpol.txt' determines what tripwire looks for and how it reacts.

3.1) View configuration settings in clear text configuration file 'twcfg.txt'.


3.2) View the clear text policy file 'twpol.txt'.

A Tripwire policy is a sequence of two kind of rules. Normal ones define which properties of a file or directory tree must be checked, in this format:

object_name -> property_mask (attribute = value);
  
Where,
object_name is the Tripwire term for files and directories.

property_mask is a series of file or directory  properties to examine or ignore for a given object. There are a number of predefined variables that describe common property masks such as ReadOnly, Dynamic, Growing, IgnoreNone, Device.

Attributes provide additional, rule-specific information. There are 4 attributes: rulename, severity, emailto, recurse.

The other kind of rules are stop points, which define an exception to a rule (tell Tripwire not to scan a particular file or directory).

For example,
/home/shabbir/www  ->  $(ReadOnly)  (recurse=1) ;  

tells Tripwire to treat the first level of my WWW directory as read-only. recurse=1 means to check the dir down one level (the dir itself plus everything immediately below, but no further).

!/home/shabbir/www/guestbook.html ;

is a stop point. Tells tripwire to ignore changes to the file guestbook.html.
  

4) Encrypt configuration and policy files.

4.1) Encrypt cleartext configuration file 'twcfg.txt' using the site key to create encrypted binary config file 'tw.cfg'.
 [root@meru tripwire]# twadmin --create-cfgfile --site-keyfile ./site.key twcfg.txt
Please enter your site passphrase:
Wrote configuration file: /etc/tripwire/tw.cfg

4.2) Encrypt cleartext policy file 'twpol.txt' using the site key to create encrypted binary policy file 'tw.pol'.
[root@meru tripwire]# twadmin --create-polfile  --site-keyfile ./site.key twpol.txt
Please enter your site passphrase:
Wrote policy file: /etc/tripwire/tw.pol


NOTE: The reason why the two files must be encrypted is that Tripwire will discover if they are corrupted much more easily than if they were in plain-text format. You should delete the plain text versions after encrypting them. The plain text versions can be retrieved later by the commands:
twadmin --print-cfgfile > twcfg.txt
twadmin --print-polfile > twpol.txt


5) Create (Initialize) the Database.
Tripwire reads the policy file, generates a database based on its contents, and then crypto‐graphically signs the resulting database.  

[root@meru tripwire]# tripwire --init
Wrote database file: /var/lib/tripwire/meru.mycompany.com.twd
The database was successfully generated.


6) Run Periodic Checks.
[root@meru tripwire]# tripwire --check


This compares all protected files against the hash database and prints a report both on the screen and to a binary file. The report will reside in '/var/lib/tripwire/report' with a time-date stamp appended to it's filename. The report can be viewed later with the command
[root@meru tripwire]# twprint --print-report --report-level 4 --twrfile /var/lib/tripwire/report/meru.mycompany.com-20150608-154127.twr


The generated report describes each policy file violation in detail, depending on whether the specified file system object was added, deleted, or changed.  Each report item lists the properties of the object as it currently resides on the file system, and, if appropriate, the old value stored in the database.

If there are differences between the database and the current system, the administrator can either fix the problem by replacing the current file with the correct file (e.g., an intruder replaced /bin/login), or update the database to reflect the new file (e.g., a fellow system administrator installed a new version of /usr/local/bin/emacs).

7) Updating Tripwire's database after violations. 
Running tripwire in Database Update mode allows any differences between the database and the current system to be reconciled. This will prevent the violation from showing up in future reports. If the reported change is unexpected and potentially malicious, then the changed file should be replaced with the original version.  If there is a valid reason for the change, the database must be changed to match the current files.

[root@meru tripwire]# tripwire --update --twrfile /var/lib/tripwire/report/meru.mycompany.com-20150608-154127.twr

Remove the "x" from the adjacent box to prevent updating the database with the new values for this object.
Added:
[x] "/home/shabbir/www"

NOTE: If the change is legitimate, leave the 'x' there. If it isn't , delete the 'x'. 

The second way to update the database is to run the check in interactive mode, which starts the update session after the check finishes.
[root@meru tripwire]# tripwire --check --interactive


8) Changing Tripwire's Policy.
twadmin command should be used to install only the initial policy, not updated policies. If you need to change your tripwire policy after the database has been initialized (i.e. after you've run tripwire --init), use the below commands to dump, edit and install it again.

8.1) Generate the plain text version
[root@meru tripwire]# twadmin --print-polfile > twpol.txt

8.2) Edit the plain text policy file
[root@meru tripwire]# vi twpol.txt

8.3) Install the updated policy
[root@meru tripwire]# tripwire --update-policy twpol.txt
 

Tripwire will parse the policy file, generate a new database, and compare all records that the new and old database have in common. If any of the common records don't match, tripwire will not update the database or the policy. You will need to run a tripwire --check followed by --update (or  --check --interactive). Then run the policy update again.

 
9) Run automatic checking.
A cron job has already been set up. The tripwire RPM installs the script '/etc/cron.daily/tripwire-chec'. Tripwire will perform an integrity check once  every day,  and the generated report will be emailed to root.

Saturday, 6 June 2015

Configure Kerberos Authentication in RHEL7


In this tutorial, we will configure a client machine to use Kerberos authentication. We will use a LDAP server for user information. 

For Kerberos Server configuration, refer to this post. For LDAP Server configuration, refer to this post.

We use the System Security Services Daemon (SSSD)  for user information services and authentication, instead of  the  legacy services.

We use the authconfig tool for authentication configuration.
 If --test action is specified, the authconfig just  reads  the  current settings  from the various configuration files and prints their values. If --update action is specified, authconfig must be  run  by  root, and configuration changes are saved.

Each  --enable has a matching --disable option that disables the service if it  is  already  enabled.  

Consider the following scenario:

Kerberos Realm:   MYCOMPANY.COM
Kerberos Server:  meru.mycompany.com

LDAP Server:        oserver1.mycompany.com
LDAP Base DN:     dc=my-domain,dc=com

Client Machine:    server2.mycompany.com

NOTE: 1) Ensure that time synchronization is maintained between all the machines. Kerberos requires accurate time synchronization to work properly. 
            2) Ensure that host name resolution is working. Configure DNS Server or /etc/hosts.

Perform the following steps on the client machine:

1) Install packages
[root@server2 ~]# yum install sssd* openldap-clients pam_krb5 krb5-workstation 

2) Configure LDAP
[root@server2 ~]# authconfig --enableldap --ldapserver="ldap://oserver1.mycompany.com:389" --ldapbasedn="dc=my-domain,dc=com" --update

Where,
--enableldap -> Use LDAP as an Identity Store. Configures user information services in /etc/nsswitch.conf.  

--ldapserver="ldap://oserver1.mycompany.com:389" -> The URL of the LDAP Server. This usually requires both the host name and port number of the LDAP server.

--ldapbasedn="dc=my-domain,dc=com" -> gives the root suffix or distinguished name (DN) for the user directory. All of the user entries will exist below this parent entry.


3) Test connection to LDAP server. We assume that an entry for user 'katrina' is present in the LDAP database.
[root@server2 ~]# ldapsearch '(uid=katrina)'


4) Configure Kerberos
[root@server2 ~]# authconfig --enablekrb5 --krb5realm MYCOMPANY.COM --krb5kdc meru.mycompany.com --krb5adminserver meru.mycompany.com --update

Where,
--enablekrb5 -> Enable Kerberos authentication.  

--krb5realm MYCOMPANY.COM  -> Kerberos realm
 
--krb5kdc meru.mycompany.com -> Host name of the Kerberos KDC Server

--krb5adminserver meru.mycompany.com -> Host name of the Kerberos admin server


5) Create user principal for 'katrina' in Kerberos database.
[root@server2 ~]# kadmin -p shabbir/admin -w shabbir
Authenticating as principal shabbir/admin with password.
kadmin:  add_principal katrina
WARNING: no policy specified for katrina@MYCOMPANY.COM; defaulting to no policy
Enter password for principal "katrina@MYCOMPANY.COM":
Re-enter password for principal "katrina@MYCOMPANY.COM":
Principal "katrina@MYCOMPANY.COM" created.

6) Verify Kerberos Operation
[root@server2 ~]# kinit katrina  
 Password for katrina@MYCOMPANY.COM:

[root@server2 ~]# klist
Ticket cache: KEYRING:persistent:0:0
Default principal: katrina@MYCOMPANY.COM

Valid starting       Expires              Service principal
06/06/2015 10:51:37  06/07/2015 10:51:37  krbtgt/MYCOMPANY.COM@MYCOMPANY.COM
    renew until 06/06/2015 10:51:37

[root@server2 ~]# kdestroy


7) Create home directory on first login (if it doesnot exist).
[root@server2 ~]# authconfig --enablemkhomedir --update

8) Verify configuration changes
[root@server2 ~]# authconfig --test

9) Comment entry for user 'katrina' in '/etc/passwd' if exists.

10) Run the below command to verify that user information retrieval from LDAP server is working.
[root@server2 ~]# getent passwd katrina
katrina:x:1002:1002::/home/katrina:/bin/bash

11) Log in as user 'katrina' and enter password as given for user principal 'katrina' in the Kerberos database.

Thursday, 4 June 2015

Log Monitoring using Swatch in RHEL7

The Simple WATCHer is a log monitoring tool that constantly searches log files and alerts system administrators of anything that matches the patterns described in the configuration file.

It’s an efficient way to monitor  system events like failed login attempts, installation of new packages etc
swatch, a free log-monitoring utility written 100% in Perl, monitors logs as they're being written and takes action when it finds something you've told it to look out for. Swatch does for logs what tripwire does for system-file integrity. - See more at: http://etutorials.org/Linux+systems/secure+linux-based+servers/Chapter+10.+System+Log+Management+and+Monitoring/Section+10.5.+Using+Swatch+for+Automated+Log+Monitoring/#sthash.ai9veCh9.dpuf

Swatch uses two required fields:
  • Pattern: A regular expression to search in the log file.
  • Action: The action to perform for a pattern match, like output the log entry to the console, send an email, or execute a script.
Consider the following example:

[root@server1 ~]# vi /etc/swatch/secure.conf
watchfor /ssh.*: session opened for user/ 
echo bold
mail=root@server1.mycompany.com, subject="Successful SSH Login"


[root@server1 ~]# swatch --config-file=/etc/swatch/secure.conf --tail-file=/var/log/secure --daemon

In the above example, Swatch will search the /var/log/secure log file continuously for the regular expression defined in the /etc/swatch/secure.conf config file and will output the log entry to the console on every successful SSH login and also mail the log entry to root@server1.mycompany.com.

--daemon option means that Swatch will run as a daemon (background process).


Perform the following steps:

1) Install EPEL Repository
[root@server1 ~]# yum install epel-release

2) Install packages
[root@server1 ~]# yum install swatch

3) Create config directory and configuration files
[root@server1 ~]# mkdir /etc/swatch

3.1) Monitor failed login attempts, successful root logins, failed SSH login attempts, successful SSH root login,  in the /var/log/secure log file.
[root@server1 ~]# vi /etc/swatch/secure.conf

watchfor /FAILED/
echo bold
mail=root@server1.mycompany.com, subject="Failed Login Attempt"

watchfor /ROOT LOGIN/
echo bold
mail=root@server1.mycompany.com, subject="Successful Root Login"

watchfor /ssh.*: Failed password/
echo bold
mail=root@server1.mycompany.com, subject="Failed SSH Login Attempt"

watchfor /ssh.*: session opened for user root/ 
echo bold
mail=root@server1.mycompany.com, subject="Successful SSH Root Login"

 
3.2) Monitor installation of packages in /var/log/messages log file.
[root@server1 ~]# vi /etc/swatch/messages.conf

watchfor /Installed/
echo bold
mail=root@server1.mycompany.com, subject="Installed New Package"


4) Execute Swatch
[root@server1 ~]# swatch --config-file=/etc/swatch/secure.conf --tail-file=/var/log/secure --daemon

[root@server1 ~]# swatch --config-file=/etc/swatch/messages.conf --tail-file=/var/log/messages --daemon


In this post we have manually started swatch. In the next post we will configure swatch as a custom daemon in 'systemd' by creating a custom unit file in 'systemd' and loading it into 'systemd'.

Tuesday, 19 May 2015

OpenVPN - Point-to-Point VPN using SSL/TLS mode in RHEL7

OpenVPN has 2 authentication modes:
1) Static Key Mode: uses a pre-shared key for authentication. A pre-shared key is generated and shared between both OpenVPN peers.

2) TLS/SSL mode: uses digital certificates for authentication and key exchange. An SSL session is established with both client and server authenticating each other with digital certificates.

In this tutorial, we will establish a point-to-point VPN tunnel using TLS/SSL mode, between two hosts:
Server: 192.168.3.2
Client:  192.168.3.1

The tunnel endpoints will be as follows:
Server: 10.8.0.2
Client:  10.8.0.1  

The VPN tunnel end-points represent a secure alternate path between the two hosts. For example, from client, you can 'telnet' to the server over the VPN by using the tunnel endpoint address of the server, as shown below:
telnet 10.8.0.2

Or, you can 'telnet' directly to the server, by using the server's ip address, as shown below:
telnet 192.168.3.2

NOTE: Ensure that the address you use for the tunnel endpoints is not part of any existing subnet on both the machines. 
 
In this tutorial, we use the sample keys and certificates from the dir '/usr/share/doc/openvpn-2.3.6/sample/sample-keys/'.

Server Configuration: (192.168.3.2)


1) Install EPEL Repository
[root@zserver1 ~]# yum install epel-release

2) Install packages
[root@zserver1 ~]# yum --disablerepo=\* --enablerepo=epel install openvpn

3) Files needed on the server. Sample files from the dir. '/usr/share/doc/openvpn-2.3.6/sample/sample-keys/'
a) CA's certificate (ca.crt)
b) Server's Certificate (server.crt)
c) Server's Private Key (server.key)
d) Diffie-Hellman Parameters (dh2048.pem)

4) Create the server config file '/etc/openvpn/server.conf'. Add the following entries.
dev tun 

ifconfig 10.8.0.2  10.8.0.1

tls-server
 

dh /usr/share/doc/openvpn-2.3.6/sample/sample-keys/dh2048.pem

ca /usr/share/doc/openvpn-2.3.6/sample/sample-keys/ca.crt
 

cert /usr/share/doc/openvpn-2.3.6/sample/sample-keys/server.crt
 

key /usr/share/doc/openvpn-2.3.6/sample/sample-keys/server.key


5) Start VPN Server
[root@zserver1 openvpn]#  systemctl start openvpn@server.service

6) Configure firewall. Open UDP port 1194 and enable virtual device 'tun0'.
[root@zserver1 openvpn]# firewall-cmd --zone=public --add-port=1194/udp --permanent
[root@zserver1 openvpn]#firewall-cmd --zone=public --add-interface=tun0 --permanent
[root@zserver1 openvpn]# firewall-cmd --reload


Client Configuration: (192.168.3.1)


1) Install EPEL Repository
[root@meru ~]# yum install epel-release

2) Install packages
[root@meru ~]# yum --disablerepo=\* --enablerepo=epel install openvpn

3) Files needed on the client. Sample files from the dir. '/usr/share/doc/openvpn-2.3.6/sample/sample-keys/'.
a) CA's certificate (ca.crt)
b) Client's Certificate (client.crt)
c) Client's Private Key (client.key)

4) Create the client config file '/etc/openvpn/client.conf'. Add the following entries.
remote 192.168.3.2  

dev tun

ifconfig 10.8.0.1  10.8.0.2

tls-client
 

ca /usr/share/doc/openvpn-2.3.6/sample/sample-keys/ca.crt
 

cert /usr/share/doc/openvpn-2.3.6/sample/sample-keys/client.crt
 

key /usr/share/doc/openvpn-2.3.6/sample/sample-keys/client.key


5) Connect to the VPN Server
[root@meru ~]#  openvpn --config /etc/openvpn/client.conf

6) Open another terminal window. And configure firewall. Enable virtual device 'tun0'.
[root@meru ~]# firewall-cmd --zone=public --add-interface=tun0 --permanent
[root@meru ~]# firewall-cmd --reload

7) To test the VPN, ping 10.8.0.2 from the client and 10.8.0.1 from the server
[root@meru ~]# ping 10.8.0.2

Monday, 18 May 2015

OpenVPN - Point-to-Point VPN using Static Key Authentication in RHEL7

OpenVPN has 2 authentication modes:
1) Static Key Mode: uses a pre-shared key for authentication. A pre-shared key is generated and shared between both OpenVPN peers.

2) TLS/SSL mode: uses digital certificates for authentication and key exchange. An SSL session is established with both client and server authenticating each other with digital certificates.

In this tutorial, we will establish a point-to-point VPN tunnel using static key, between two hosts:
Server: 192.168.3.2
Client:  192.168.3.1

The tunnel endpoints will be as follows:
Server: 10.8.0.2
Client:  10.8.0.1  

The VPN tunnel end-points represent a secure alternate path between the two hosts. For example, from client, you can 'telnet' to the server over the VPN by using the tunnel endpoint address of the server, as shown below:
telnet 10.8.0.2

Or, you can 'telnet' directly to the server, by using the server's ip address, as shown below:
telnet 192.168.3.2

NOTE: Ensure that the address you use for the tunnel endpoints is not part of any existing subnet on both the machines. 
 

Server Configuration: (192.168.3.2)


1) Install EPEL Repository
[root@zserver1 ~]# yum install epel-release

2) Install packages
[root@zserver1 ~]# yum --disablerepo=\* --enablerepo=epel install openvpn

3) Generate the shared secret key to be used for authentication between client and server.
[root@zserver1 ~]# cd /etc/openvpn
[root@zserver1 openvpn]# openvpn --genkey --secret static.key

4) Create the server config file '/etc/openvpn/server.conf'. Add the following entries.
dev tun 
ifconfig 10.8.0.2  10.8.0.1
secret /etc/openvpn/static.key

5) Start VPN Server
[root@zserver1 openvpn]#  systemctl start openvpn@server.service

6) Configure firewall. Open UDP port 1194 and enable virtual device 'tun0'.
[root@zserver1 openvpn]# firewall-cmd --zone=public --add-port=1194/udp --permanent
[root@zserver1 openvpn]#firewall-cmd --zone=public --add-interface=tun0 --permanent
[root@zserver1 openvpn]# firewall-cmd --reload


Client Configuration: (192.168.3.1)


1) Install EPEL Repository
[root@meru ~]# yum install epel-release

2) Install packages
[root@meru ~]# yum --disablerepo=\* --enablerepo=epel install openvpn

3) Copy the shared secret key file '/etc/openvpn/static.key' from the server, to the dir '/etc/openvpn/' on the client.

4) Create the client config file '/etc/openvpn/client.conf'. Add the following entries.
remote 192.168.3.2  
dev tun
ifconfig 10.8.0.1  10.8.0.2
secret /etc/openvpn/static.key

5) Connect to the VPN Server
[root@meru ~]#  openvpn --config /etc/openvpn/client.conf

6) Open another terminal window. And configure firewall. Enable virtual device 'tun0'.
[root@meru ~]# firewall-cmd --zone=public --add-interface=tun0 --permanent
[root@meru ~]# firewall-cmd --reload

7) To test the VPN, ping 10.8.0.2 from the client and 10.8.0.1 from the server
[root@meru ~]# ping 10.8.0.2

Wednesday, 13 May 2015

Block Email Spam using Procmail with Postfix


Procmail is a local MDA (Mail Delivery Agent). It delivers mail from the MTA's spool file to the local user's mailbox. Before delivering mail, Procmail filters mail based on the 'recipes' (rules) defined in '/etc/procmailrc' file or '~/.procmailrc' file defined in the user's home directory.


1) Install package
[root@meru ~]# yum install procmail

2) Configure 'postfix' to use 'procmail' as it's MDA (Mail Delivery Agent). Edit the file ' /etc/postfix/main.cf' and add the following line.
     mailbox_command = /usr/bin/procmail -a "$EXTENSION"

3) Check for errors in config file and restart 'postfix'
[root@meru ~]# postfix check
[root@meru ~]# systemctl restart postfix

4) Create the procmail config file '/etc/procmailrc' and add the following entries
#Recipe No 1
:0
* ^From: katrina@outsider.com
/dev/null

#Recipe No 2
:0
* ^From: .+@spammers.com
/dev/null

#Recipe No 3
:0
* ^Subject:.*Viagra
/dev/null

#Recipe No 4
:0
* ^Subject:.*(free gift|lottery)
/dev/null


Recipe no 1, defines a rule to delete  all mail from 'katrina@outsider.com'.

Recipe no 2, defines a rule to delete  all mail from the domain 'outsider.com'.

Recipe no 3, defines a rule to delete  all mail which have the word 'viagra' in the subject.

Recipe no 4, defines a rule to delete  all mail which have the words 'free gift' or 'lottery' in the subject.


Recipes have the following format:
 :0 [flags] [ : [locallockfile] ] 
<zero or more conditions (one per line)> 
<exactly one action line> 

For basic recipes, you do not need any flags.

Using a : after the :0 is to use a lockfile. A lockfile is necessary to prevent problems if 2 or more instances of procmail are working at the same time (that may happen if 2 or more email arrive almost at the same moment). 

A condition starts with an asterisk, following an extended regexp, like this one:
* ^FROM:.*(aol.com|spamsenders)

The action can be only a mailbox name, or an external program. An action can be something as simple as
work
in that case, the mail that complies with the condition will be saved on the work inbox.


Friday, 8 May 2015

Public Key Authentication in SSH Server

Public Key Authentication (User Authentication):


In password based authentication, you prove your identity by proving that you know the correct password. And giving the correct password to the server. If the server is hacked or spoofed, an attacker can learn your password.

Public key authentication solves this problem. You generate a key pair, consisting of a public key (which everybody is allowed to know) and a private key (which you keep secret). The private key is able to generate signatures. A signature created using your private key cannot be forged by anybody who doesnot have that key. But anybody who has your public key can verify that a particular signature is genuine.

You generate a key pair on your own computer, and copy the public key to the server. Then, when the server asks you to prove your identity, you generate a signature using your private key. The server verifies that signature using your public key and allows you to log in. The private key never leaves the client machine, and therefore cannot be stolen (from the server) or guessed like a password can.

If your private key is stored unprotected on your computer, then anybody who hacks your computer will gain access to your private key. For this reason, the private key is usually encrypted when it is stored on your machine, using a passphrase. At the time of login, to generate the signature, you have to enter the passphrase to decrypt the private key. 


1) Generate key pair on your own computer
[batul@meru ~]$ ssh-keygen
Generating public/private rsa key pair.
Enter file in which to save the key (/home/batul/.ssh/id_rsa):
Created directory '/home/batul/.ssh'.
Enter passphrase (empty for no passphrase):
Enter same passphrase again:
Your identification has been saved in /home/batul/.ssh/id_rsa.
Your public key has been saved in /home/batul/.ssh/id_rsa.pub.
The key fingerprint is:
13:8d:97:9e:57:2e:90:52:2e:50:56:07:16:c5:ba:e7 batul@meru.mycompany.com
The key's randomart image is:
+--[ RSA 2048]----+
|      ..o.*=o    |
|       o * +.    |
|        = B.  .  |
|         *.o o   |
|        S o.o .  |
|         .....   |
|           o     |
|            E    |
|                 |
+-----------------+


2) Copy the key to the server to the file '/home/batul/.ssh/authorized_keys'
[batul@meru ~]$ ssh-copy-id batul@oserver1.outsider.com
The authenticity of host 'oserver1.outsider.com (192.168.100.2)' can't be established.
ECDSA key fingerprint is d2:1c:09:01:5b:d4:a9:e0:7b:2b:19:6a:7f:23:6d:c0.
Are you sure you want to continue connecting (yes/no)? yes
/bin/ssh-copy-id: INFO: attempting to log in with the new key(s), to filter out any that are already installed
/bin/ssh-copy-id: INFO: 1 key(s) remain to be installed -- if you are prompted now it is to install the new keys
batul@oserver1.outsider.com's password:

Number of key(s) added: 1

Now try logging into the machine, with:   "ssh 'batul@oserver1.outsider.com'"
and check to make sure that only the key(s) you wanted were added.


3) Log in to the server
[batul@meru ~]$ ssh batul@oserver1.outsider.com
Enter passphrase for key '/home/batul/.ssh/id_rsa':
Last login: Fri May  8 19:48:28 2015
[batul@oserver1 ~]$


Verifying the Host Key ( Server Authentication)

When you connect to a server for the first time, you will see a message as shown below:
[batul@meru ~]$ ssh batul@oserver1.outsider.com
The authenticity of host 'oserver1.outsider.com (192.168.100.2)' can't be established.
ECDSA key fingerprint is d2:1c:09:01:5b:d4:a9:e0:7b:2b:19:6a:7f:23:6d:c0.
Are you sure you want to continue connecting (yes/no)? yes

This is a feature of the SSH protocol. It is designed to protect you against spoofing attack (secretly redirecting your connection to a different computer so that you send your password to the wrong machine). Using this technique, an attacker can learn your password.

To prevent this attack, the client stores the public key of the server in the '.ssh/known_hosts' file in the user's home directory. When the client connects to the server, the server sends a signature created with it's private key to the client. The client verifies the signature with the server's public key, and then proceeds with user authentication. In case, the verification fails, you get the message as shown below:

[batul@meru ~]$ ssh batul@oserver1.outsider.com
key_read: uudecode AAAAE2VjZHNhLNoYTItbmlzdHAyNTYAAAAIbmlzdHAyNTYAAABBBG4a7mA8YAKR7Xtv9NYxyZCU81aHvsmig9RKXgaduxlDYOuDIcwfTN4FH74u6pn5seyYY+qGhmu+B7Hq8JV89WM=
 failed
@@@@@@@@@@@@@@@@@@@@@@@@@@@@@@@@@@@@@@@@@@@@@@@@@@@@@@@@@@@
@       WARNING: POSSIBLE DNS SPOOFING DETECTED!          @
@@@@@@@@@@@@@@@@@@@@@@@@@@@@@@@@@@@@@@@@@@@@@@@@@@@@@@@@@@@
The ECDSA host key for oserver1.outsider.com has changed,
and the key for the corresponding IP address 192.168.122.2
is unknown. This could either mean that
DNS SPOOFING is happening or the IP address for the host
and its host key have changed at the same time.
@@@@@@@@@@@@@@@@@@@@@@@@@@@@@@@@@@@@@@@@@@@@@@@@@@@@@@@@@@@
@    WARNING: REMOTE HOST IDENTIFICATION HAS CHANGED!     @
@@@@@@@@@@@@@@@@@@@@@@@@@@@@@@@@@@@@@@@@@@@@@@@@@@@@@@@@@@@
IT IS POSSIBLE THAT SOMEONE IS DOING SOMETHING NASTY!
Someone could be eavesdropping on you right now (man-in-the-middle attack)!
It is also possible that a host key has just been changed.
The fingerprint for the ECDSA key sent by the remote host is
aa:ae:e1:09:dc:44:a2:15:0d:65:27:ef:32:e6:0b:b9.
Please contact your system administrator.
Add correct host key in /home/batul/.ssh/known_hosts to get rid of this message.
Offending ECDSA key in /home/batul/.ssh/known_hosts:2
ECDSA host key for oserver1.outsider.com has changed and you have requested strict checking.
Host key verification failed.


However, when you connect for the first time, the client has no way to know whether the host key is the right one or not. So it shows the warning as shown above (in the first example) and asks whether you want to trust this host key or not. If you select "Yes", the client saves the host key in the '.ssh/known_hosts' file and proceeds with user authentication..

You can also manually save the host key in the '.ssh/known_hosts' file.


Thursday, 7 May 2015

Bypass Firewall and IDS using stunnel in RHEL7

Consider the following scenario: You are on an untrusted network and want to ssh to your server behind your company firewall. But the company firewall is blocking port '22'. Only port '80' and '443' are open.

Running 'sshd' on port '443' will not work as any IDS will detect it using Deep Packet Inspection.

The solution is to tunnel ssh through SSL using 'stunnel'. 'stunnel' encapsulates all traffic in SSL/TLS.

Backdoors installed by trojan horses and viruses also tunnel through SSL to connect to their control server, to bypass client side firewalls and anti-virus software. Most client-side firewalls allow outgoing traffic on ports 80 and 443. Also anti-virus software will not be able to decipher encrypted SSL communication on port 443.

Consider the following scenario:
The server's IP Address is 192.168.122.2. 

The user on the client will 'ssh' to port '444' on the local machine, and traffic from port '444' on the local machine will be forwarded to the server (192.168.122.2) at port 443. Since port '443' is open in the firewall, the connection will be allowed. 

The server will accept connections on port '443' and forward traffic to port '22'. The 'sshd' is running on port '22' on the server machine. The reply from the 'sshd' will similarly be tunneled to the client.

Configure Server (192.168.122.2):

1) Install package
[root@server1 ~]# yum -y install stunnel

2) Create a self-signed certificate
[root@server1 ~]# cd /etc/pki/tls/certs
[root@server1 certs]# make stunnel.pem
You are about to be asked to enter information that will be incorporated
into your certificate request.
Country Name (2 letter code) [XX]:in
State or Province Name (full name) []:maharashtraLocality Name (eg, city) [Default City]:mumbai
Organization Name (eg, company) [Default Company Ltd]:my company ltd
Organizational Unit Name (eg, section) []:it
Common Name (eg, your name or your server's hostname) []:server1.mycompany.com
Email Address []:root@server1.mycompany.com
    
3) Create config file '/etc/stunnel/stunnel.conf' and add the following lines.
cert = /etc/pki/tls/certs/stunnel.pem
sslVersion = TLSv1
chroot = /var/run/stunnel
setuid = nobody
setgid = nobody
pid = /stunnel.pid
socket = l:TCP_NODELAY=1
socket = r:TCP_NODELAY=1
[ssh]
accept = 192.168.122.2:443
connect = 127.0.0.1:22

TIMEOUTclose = 0

The server will accept incoming traffic on port 443 and forward it to 'sshd' on port 22.


4) Create the 'chroot' dir.
[root@server1 ~]# mkdir /var/run/stunnel
[root@server1 ~]# chown nobody:nobody /var/run/stunnel

5) Start stunnel
[root@server1 ~]# stunnel /etc/stunnel/stunnel.conf

6)Ensure that port '443' is open in the firewall.
[root@server1 ~]# firewall-cmd --zone=public --add-service=https --permanent
[root@server1 ~]# firewall-cmd --reload

NOTE:To terminate stunnel
[root@server1 ~]# kill $(cat /var/run/stunnel/stunnel.pid)


Configure Client:

1) Install package
[root@meru ~]# yum -y install stunnel

2) Copy the self-signed certificate file '/etc/pki/tls/certs/stunnel.pem' from the server into the local dir '/etc/pki/tls/certs/'.
    
3) Create config file '/etc/stunnel/stunnel.conf' and add the following lines.
cert = /etc/pki/tls/certs/stunnel.pem
sslVersion = TLSv1
chroot = /var/run/stunnel
setuid = nobody
setgid = nobody
pid = /stunnel.pid
socket = l:TCP_NODELAY=1
socket = r:TCP_NODELAY=1
client = yes
[ssh]
accept = 444
connect = 192.168.122.2:443
TIMEOUTclose = 0


The user will ssh to port 444 on localhost. All data from port 444 will be passed to the server (192.168.122.2) at port 443.


4) Create the 'chroot' dir.
[root@meru ~]# mkdir /var/run/stunnel
[root@meru ~]# chown nobody:nobody /var/run/stunnel

5) Start stunnel
[root@meru ~]# stunnel /etc/stunnel/stunnel.conf

6) Test connection. Enter password for the remote server.
[root@meru ~]# ssh -p 444 shabbir@localhost
shabbir@localhost's password:
Last login: Thu May  7 18:55:16 2015 from localhost
[shabbir@server1 ~]$


You now have a ssh connection to your remote server, but all the traffic is tunneled through SSL.

7) To terminate stunnel
[root@meru ~]# kill $(cat /var/run/stunnel/stunnel.pid)


Tuesday, 5 May 2015

Access Blocked Website using SSH tunnel

This summary is not available. Please click here to view the post.

Block Websites using Squid Web Proxy Server

In this tutorial, we use Squid web proxy server to block access to websites. A file containing the list of websites to block is provided to the squid server at configuration time.


1) Install packages
      yum -y install squid


2) Create the file '/etc/squid/banned-sites.squid' containing a list of websites to block.
      www.bbc.com
      www.cnn.com


3) Change owner, permissions
      chmod 640 /etc/squid/banned-sites.squid
      chown root.squid /etc/squid/banned-sites.squid


4) Edit the file '/etc/squid/squid.conf' and add the following lines.

     #In the acl section, add this line
     acl blocksites dstdomain "/etc/squid/banned-sites.squid"

     #In the http_access  section, add this line
     http_access deny blocksites

5) Start the service
     systemctl start squid
     systemctl enable squid

6) Open Firewall Ports.
     firewall-cmd --zone=public --add-port=3128/tcp --permanent
     firewall-cmd --reload

7) Configure Browser's proxy server settings.
      You have to configure your browser's proxy server settings to point to    the squid proxy server. For firefox web browser, the steps are as follows:  click Preferences, click Advanced, click Network, click Settings, Click Manual Proxy Configuration. In HTTP Proxy enter IP address of the Squid proxy server and in Port enter 3128 (the default port of squid proxy server)

8) Access website in browser


NOTE: In the file '/etc/squid/squid.conf', the default settings for local network are configured for 10.0.0.0/8, 172.16.0.0/12, 192.168.0.0/24. If your local network is not in this range, then add your own rule as follows:
       acl your-network-acl-name src ip-range
       http_access allow your-network-acl-name


Monday, 4 May 2015

IPSec VPN (public key authentication) using Libreswan in RHEL7

In Public key authentication, the hosts are manually configured with each other's public key.  Authentication is based on  the hosts having their private key. The hosts should have their private key to authenticate each other.
The use of public key authentication is recommended over  PSK authentication. In a PSK system a major issue is the secure distribution of the PSK to remote hosts. This problem doesnot occur in public key authentication as the public key is not secret and can be distributed without any fear.      

Consider 2 hosts:
Left:   192.168.100.2
Right: 192.168.100.3
An IPSec VPN tunnel will be established between these 2 hosts.
 
On both the machines, run the following commands:
 1) Install package
       yum -y install libreswan

2) Open firewall ports. 500/udp, protocol=esp
     firewall-cmd --zone=public --add-port=500/udp --permanent
     firewall-cmd --add-rich-rule='rule protocol value="esp" accept' --permanent
     firewall-cmd --reload

3) Generate RSA key pair      
    ipsec  newhostkey  --configdir  /etc/ipsec.d  --output  /etc/ipsec.d/oserver.secrets
  

4) Edit the file '/etc/ipsec.conf' and uncomment the below line
     include /etc/ipsec.d/*.conf


On the host "Left" 192.168.100.2 , run the following command
    ipsec showhostkey --left > left.pub


On the host "Right" 192.168.100.3
1) run the following command
     ipsec showhostkey --right > right.pub

2) copy the file 'right.pub' to the Left host.(192.168.100.2)


On the host "Left" 192.168.100.2
1) Create the file '/etc/ipsec.d/oserver.conf' and add the following entries.
      conn myconn
           left=192.168.100.2
           leftrsasigkey=0sAQO86qaScc1wsNN6G7 [...]
           right=192.168.100.3
           rightrsasigkey=0sAQPFZNZ1/OPvK8Gcl1iktCK [...]
           authby=rsasig
           auto=add


     Note: 1) Copy the leftrsasigkey from the file 'left.pub' by using vi editor's read file command. :r left.pub. Similarly copy rightrsasigkey from the file 'right.pub' by using the command :r right.pub.
Copy paste from the terminal can lead to extra newlines, carriage returns which can corrupt the key.     
 2) Remember to maintain indentation as shown above. Also don't leave any blank lines in between the entries.

2) copy the file '/etc/ipsec.d/oserver.conf' to the Right host.(192.168.100.3)


On both the hosts, Start the service
       systemctl start ipsec


On any one machine, run the following commands:
1) Establish  the connection.      ipsec auto --up myconn
      
2) View Status
      ipsec auto --status

Saturday, 2 May 2015

Email Encryption using S/MIME in Evolution Email Client

Consider the following scenario:

Consider Batul sending an email to Shabbir. When Batul sends a digital signature, she signs the email with her private key. And Shabbir will verify it with Batul's public key.

But when Batul sends an encrypted mail to Shabbir, she encrypts it with Shabbir's public key. And Shabbir will decrypt it with his private key.

Encryption by itself is not sufficient. Because the contents of the message are secret, but there is no guarantee that the mail has come from Batul. Batul has to send a digital signature to prove that she has sent the message and that the message has not been altered during transit.

In this tutorial, we create a local CA on Batul's machine. This local CA creates S/MIME certificates for users Batul and Shabbir.

We will then add Batul and Shabbir's certificate along with the CA certificate to their email clients. Then we will send encrypted mail.

Batul's Machine: On Batul's machine, perform the following steps.

1) Install package
[batul@server3 ~]$ sudo yum -y install openssl

2) Create S/MIME Certificate for Batul's email-id. Follow the following steps:
    2.1) Create local CA. The CA certificate file '/etc/pki/CA/cacert.pem' will be added to Batul and Shabbir's email client.
[root@server3 ~]# /etc/pki/tls/misc/CA  -newca

    2.2) Create public-private key pair
[root@server3 ~]# openssl genrsa -out batul.key

    2.3) Create a certificate signing request (CSR) for Batul's email address.
[root@server3 ~]# openssl req -new -key batul.key -out batul.csr
Country Name (2 letter code) [XX]:inState or Province Name (full name) []:maharashtra
Locality Name (eg, city) [Default City]:mumbai
Organization Name (eg, company) [Default Company Ltd]:my company ltd
Organizational Unit Name (eg, section) []:it
Common Name (eg, your name or your server's hostname) []:batul@mycompany.com
Email Address []:batul@mycompany.com

    2.4) Sign the Certificate.
[root@server3 ~]# openssl ca -in batul.csr  -out batul.crt

   2.5) Create pkcs12 format file. The pkcs12 file combines the Certificate and key file into one file.
[root@server3 ~]# openssl pkcs12 -export -inkey batul.key  -in batul.crt -out batul.pkcs12
Enter Export Password:
Verifying - Enter Export Password:

Batul's certificate files: batul.pkcs12, batul.crt


3) Create S/MIME Certificate for Shabbir's email-id. Follow the following steps:
    3.1) Create public-private key pair
[root@server3 ~]# openssl genrsa -out shabbir.key

    3.2) Create a certificate signing request (CSR) for Shabbir's email address.
[root@server3 ~]# openssl req -new -key shabbir.key -out shabbir.csr
Country Name (2 letter code) [XX]:inState or Province Name (full name) []:maharashtra
Locality Name (eg, city) [Default City]:mumbai
Organization Name (eg, company) [Default Company Ltd]:my company ltd
Organizational Unit Name (eg, section) []:it
Common Name (eg, your name or your server's hostname) []:shabbir@mycompany.com
Email Address []:shabbir@mycompany.com

    3.3) Sign the Certificate.
[root@server3 ~]# openssl ca -in shabbir.csr  -out shabbir.crt

   3.4) Create pkcs12 format file. The pkcs12 file combines the Certificate and key file into one file.
[root@server3 ~]# openssl pkcs12 -export -inkey shabbir.key  -in shabbir.crt -out shabbir.pkcs12
Enter Export Password:
Verifying - Enter Export Password:


 Shabbir's certificate files: shabbir.pkcs12, shabbir.crt


 4) Add Batul's Email Certificate, Shabbir's email certificate and C.A. Certificate in Evolution Email Client
    Click Applications, click Office, Click Evolution.
    In the Evolution main menu, Click Edit, Click Preferences.

    In the left tab, click Certificates.
    In the tab, Your Certificates, Click Import button.Select the file batul.pkcs12. (created above) 

    In the tab, Contact Certificates, Click Import button.Select the file shabbir.crt.  

    In the tab Authorities. Click Import button. Select the CA Certificate file cacert.pem. In the 'Certificate Authority Trust Window' select "Trust this CA to identify email users".

    In the left tab, click Mail Accounts.
    Select Account Name batul@mycompany.com, click Edit
    In the left tab, Click Security. 
   In the section Secure MIME, for Signing Certificate select Batul's certificate and for Encryption Certificate select Batul's certificate.
    Click OK.
5) Give the following files to Batul's friend Shabbir, to configure in his email client.  Shabbir's pkcs12 certificate file: shabbir.pkcs12
            Batul's certificate file: batul.crt
            CA certificate file: cacert.pem


Shabbir's Machine: On Shabbir's machine, perform the following steps.

1) Add Shabbir's pkcs12 Certificate, Batul's Certificate and C.A. Certificate in Evolution Email Client
    Click Applications, click Office, Click Evolution.
    In the Evolution main menu, Click Edit, Click Preferences.

    In the left tab, click Certificates.
    In the tab, Your Certificates, Click Import button.Select the file shabbir.pkcs12.  

    In the tab, Contact Certificates, Click Import button.Select the file batul.crt.  

    In the tab Authorities. Click Import button. Select the CA Certificate file cacert.pem. In the 'Certificate Authority Trust Window' select "Trust this CA to identify email users".

    In the left tab, click Mail Accounts.
    Select Account Name shabbir@mycompany.com, click Edit
    In the left tab, Click Security. 
   In the section Secure MIME, for Signing Certificate select Shabbir's certificate and for Encryption Certificate select Shabbir's certificate.
    Click OK.

3) Send encrypted mail to Batul.
    On the Evolution main screen, click New to Compose a new mail message
    In the Compose Message menu, click Options. Click S/MIME Encrypt. 
    Enter Batul's email id and other email details and click Send to send the message.

    The encrypted message has been sent. Batul's email client will decrypt the mail using her private key.

4) To sign the message Click S/MIME Sign in the Options menu item in the Compose Message window

Friday, 1 May 2015

Email Encryption using OpenPGP in Evolution Email Client

In this tutorial, Batul will create a public-private key pair. And give her public key to her friend Shabbir so that he can send encrypted emails to her.

Shabbir will encrypt an email using Batul's public key and send the encrypted email to her. Batul will decrypt the encrypted email using her private key.

Since nobody else knows Batul's private key, only Batul can decrypt the encrypted email. 

Batul's Machine:

1) Install package
[batul@server3 ~]$ sudo yum -y install gnupg2

2) Generate public-private key pair. Enter passphrase to protect the private key. 
[batul@server3 ~]$ gpg2 --gen-key


3) List the key.
[batul@server3 ~]$ gpg2 --list-key
/home/batul/.gnupg/pubring.gpg
------------------------------
pub   2048R/13A3D971 2015-04-30
uid                  batul dahod (batul's encrpt key) <batul@mycompany.com>
sub   2048R/8AE3A0FA 2015-04-30

4) Save the public key in a file.
[batul@server3 ~]$ gpg2 --export "batul dahod" > batul.pub

5) The public key file 'batul.pub' is given to Batul's friend Shabbir , so that he can send encrypted email to her.

Shabbir's Machine:
1) Install Batul's public key
[shabbir@meru ~]$ gpg2 --import batul.pub
gpg: key 13A3D971: public key "batul dahod (batul's encrpt key) <batul@mycompany.com>" imported
gpg: Total number processed: 1
gpg:               imported: 1  (RSA: 1)

2) Configure Evolution Email Client
    Click Applications, click Office, Click Evolution.
    In the Evolution main menu, Click Edit, Click Preferences,
    Select Account Name shabbir@mycompany.com, click Edit
    In the left tab, Click Security
    Select the option Always trust keys in my keyring when encrypting
    Save the settings and exit.

3) Send encrypted mail to Batul.
    On the Evolution main screen, click New to Compose a new mail message
    In the Compose Message menu, click Options. Click PGP Encrypt.
    Enter Batul's email id and other email details and click Send to send the message.

    The encrypted message has been sent. Batul's email client will decrypt the mail using her private key.


Part 2: Digitally Signed Email

In this tutorial, Batul will digitally sign an email  using her private key and send the email to Shabbir. Shabbir's email client will verify the signature on the email using Batul's public key.

Since nobody else knows Batul's private key, only Batul could have signed the email. So Shabbir can be sure that the email has been sent by Batul and that it has not been modified in transit. 

 
Batul's Machine:
1) List the key and note down the OpenPGP Key ID. It will be configured in the email client.
[batul@server3 ~]$ gpg2 --list-key
/home/batul/.gnupg/pubring.gpg
------------------------------
pub   2048R/13A3D971 2015-04-30
uid                  batul dahod (batul's encrpt key) <batul@mycompany.com>
sub   2048R/8AE3A0FA 2015-04-30

2) Configure Evolution Email Client
    Click Applications, click Office, Click Evolution.
    In the Evolution main menu, Click Edit, Click Preferences,
    Select Account Name batul@mycompany.com, click Edit
    In the left tab, Click Security
    Enter the OpenPGP Key ID as noted in step 1. (13A3D971 in this example)
    Save the settings and exit.

3) Send signed mail to Shabbir.

    On the Evolution main screen, click New to Compose a new mail message
    In the Compose Message menu, click Options. Click PGP Sign.
    Enter Shabbir's email id and other email details and click Send to send the message.

    The signed message has been sent. Shabbir's email client will verify the signature using Batul's public key.

Thursday, 30 April 2015

Digital Signature using OpenPGP (gpg2) in RHEL7

In this tutorial, Batul will create a public-private key pair. And give her public key to her friend Shabbir so that he can verify the digital signature on files sent by her.

Batul will sign a file using her private key and send the file along with the signature to Shabbir. Shabbir will verify the signature on the file using Batul's public key.

Since nobody else knows Batul's private key, only Batul could have signed the file. So Shabbir can be sure that the file has been sent by Batul and that it has not been modified in transit. 

 
Batul's Machine:
1) Install package
[batul@server3 ~]$ sudo yum -y install gnupg2

2) Generate public-private key pair. Enter passphrase to protect the private key. 
[batul@server3 ~]$ gpg2 --gen-key

3) List the key.
[batul@server3 ~]$ gpg2 --list-key
/home/batul/.gnupg/pubring.gpg
------------------------------
pub   2048R/13A3D971 2015-04-30
uid                  batul dahod (batul's encrpt key) <batul@mycompany.com>
sub   2048R/8AE3A0FA 2015-04-30

4) Save the public key in a file.
[batul@server3 ~]$ gpg2 --export "batul dahod" > batul.pub

5) The public key file 'batul.pub' is given to Batul's friend Shabbir , so that he can verify the digital signature on files sent by her.

6) Create a digital signature on the file 'hello.txt'
 [batul@server3 ~]$ gpg2 --armor --detach-sign hello.txt

You need a passphrase to unlock the secret key for
user: "batul dahod (batul's encrpt key) <batul@mycompany.com>"
2048-bit RSA key, ID 13A3D971, created 2015-04-30

7) Send the file 'hello.txt' and the signature file 'hello.txt.asc' to Shabbir.

 Shabbir's Machine:
1) Install Batul's public key
[shabbir@meru ~]$ gpg2 --import batul.pub
gpg: key 13A3D971: public key "batul dahod (batul's encrpt key) <batul@mycompany.com>" imported
gpg: Total number processed: 1
gpg:               imported: 1  (RSA: 1)

2) Verify digital signature on the file 'hello.txt' using the signature file 'hello.txt.asc'
[shabbir@meru ~]$ gpg2 --verify hello.txt.asc hello.txt
gpg: Signature made Thu 30 Apr 2015 05:48:32 PM IST using RSA key ID 13A3D971
gpg: Good signature from "batul dahod (batul's encrpt key) <batul@mycompany.com>"

File Encryption using OpenPGP (gpg2) in RHEL7

In this tutorial, Batul will create a public-private key pair. And give her public key to her friend Shabbir so that he can send encrypted files to her.

Shabbir will encrypt a file using Batul's public key and send the encrypted file to her. Batul will decrypt the encrypted file using her private key.

Since nobody else knows Batul's private key, only Batul can decrypt the encrypted file. 

Batul's Machine:

1) Install package
[batul@server3 ~]$ sudo yum -y install gnupg2

2) Generate public-private key pair. Enter passphrase to protect the private key. 
[batul@server3 ~]$ gpg2 --gen-key


3) List the key.
[batul@server3 ~]$ gpg2 --list-key
/home/batul/.gnupg/pubring.gpg
------------------------------
pub   2048R/13A3D971 2015-04-30
uid                  batul dahod (batul's encrpt key) <batul@mycompany.com>
sub   2048R/8AE3A0FA 2015-04-30

4) Save the public key in a file.
[batul@server3 ~]$ gpg2 --export "batul dahod" > batul.pub

5) The public key file 'batul.pub' is given to Batul's friend Shabbir , so that he can send encrypted files to her.

Shabbir's Machine:
1) Install Batul's public key
[shabbir@meru ~]$ gpg2 --import batul.pub
gpg: key 13A3D971: public key "batul dahod (batul's encrpt key) <batul@mycompany.com>" imported
gpg: Total number processed: 1
gpg:               imported: 1  (RSA: 1)

2) Encrypt a file 'hello.txt' using Batul's public key.
[shabbir@meru ~]$ gpg2 --armor -r "batul dahod" --encrypt hello.txt
gpg: 8AE3A0FA: There is no assurance this key belongs to the named user

pub  2048R/8AE3A0FA 2015-04-30 batul dahod (batul's encrpt key) <batul@mycompany.com>
 Primary key fingerprint: 71D0 897E 301A F5E7 17F8  BE8B BBA6 CC6A 13A3 D971
      Subkey fingerprint: 545F FBB1 A579 6AE0 F7B6  CEFD 9E6A AFAB 8AE3 A0FA

It is NOT certain that the key belongs to the person named
in the user ID.  If you *really* know what you are doing,
you may answer the next question with yes.

Use this key anyway? (y/N) y


3) Send the encrypted file 'hello.txt.asc' to Batul.


Batul's Machine:
1) Decrypt the file 'hello.txt.asc' using the private key
[batul@server3 ~]$ gpg2 --output hello.txt --decrypt hello.txt.asc

You need a passphrase to unlock the secret key for
user: "batul dahod (batul's encrpt key) <batul@mycompany.com>"
2048-bit RSA key, ID 8AE3A0FA, created 2015-04-30 (main key ID 13A3D971)

gpg: encrypted with 2048-bit RSA key, ID 8AE3A0FA, created 2015-04-30
      "batul dahod (batul's encrpt key) <batul@mycompany.com>"

2) View the unencrypted file 'hello.txt'.
[batul@server3 ~]$ cat hello.txt
my name is shabbir rangwala

Wednesday, 29 April 2015

IPSec VPN (PSK Authentication) using Libreswan in RHEL7

Pre-Shared Key (PSK) Authentication:

PSK Authentication is based on both the hosts having a "shared" secret key. Both the hosts should have the same secret key to authenticate each other.

The security of a PSK system is based on the PSK being secret. Therefore, a major issue is the secure distribution of the PSK to remote hosts.    

Consider 2 hosts: 192.168.122.2 and 192.168.122.3
An IPSec VPN tunnel will be established between these 2 hosts.
 
On both the machines, run the following commands:
 1) Install package
     yum -y install libreswan

2) Open firewall ports. 500/udp, protocol=esp
     firewall-cmd --zone=public --add-port=500/udp --permanent
     firewall-cmd --add-rich-rule='rule protocol value="esp" accept' --permanent
     firewall-cmd --reload

3) Edit the file '/etc/ipsec.secrets' and add the following entry.
      192.168.122.2 192.168.122.3 : PSK "!shabbir2009@"

4) Edit the file '/etc/ipsec.conf' and add the following entry.
      conn mytunnel
          left=192.168.122.2
          right=192.168.122.3
          authby=secret
          auto=add

     Note: Remember to maintain indentation as shown above. Also don't leave any blank lines in between the entries..

5) Start the service
       systemctl start ipsec

On any one machine, run the following commands:
6) Add the connection to the internal database.
      ipsec auto --add mytunnel
   
7) Establish  the connection.
      ipsec auto --up mytunnel
      
8) View Status
      ipsec auto --status

Tuesday, 28 April 2015

LDAP Authentication Server and Client in RHEL7

When a user logs into a system, that user presents some sort of credential to establish the user identity. The system then checks those credentials against the configured authentication service. If the credentials match and the user account is active, then the user is authenticated. 
The information to verify the user can be located on the local system or the local system can reference a user database on a remote system, such as LDAP or Kerberos.

A local system can use a variety of different data stores for user information, including Lightweight Directory Access Protocol (LDAP), Network Information Service (NIS), and Winbind. Additionally, both LDAP and NIS data stores can use Kerberos to authenticate users.

LDAP is often used by organizations as a central repository for user information and as an authentication service.

LDAP allows password authentication or Kerberos authentication.
The LDAP password option requires either a secure (ldaps://) URL or the TLS option to connect to the LDAP server.

In this tutorial, we will use LDAP for both identity lookup and authentication. LDAP server is configured to store the username, passwords of all users. Client machines will authenticate against this central directory service. We will use Start TLS to encrypt the connections to the LDAP server. This enables a secure connection over a standard port.

We will create an LDAP server and migrate existing '/etc/passwd' and '/etc/shadow' files to the LDAP server. Then we will configure a client machine to authenticate against this LDAP server.

Configure  LDAP Authentication Server


LDAP Server Name: oserver1.mycompany.com


1) Install packages.
[root@oserver1 ~]# yum install openldap-servers openldap-clients migration-tools

2) Start ldap server.
[root@oserver1 ~]# systemctl start slapd

3) Configure ldap client file '/etc/openldap/ldap.conf'. Edit the following entries.
       BASE dc=my-domain,dc=com 
       URI ldap://localhost


4) Verify operation of ldap server
[root@oserver1 ~]# ldapsearch -x -b '' -s base '(objectClass=*)' namingContexts

5) Add the cosine and nis LDAP schemas. These schemas contain definitions for the /etc/passwd and /etc/shadow files.
[root@oserver1 ~]# ldapadd -Y EXTERNAL -H ldapi:/// -D "cn=config" -f cosine.ldif
[root@oserver1 ~]# ldapadd -Y EXTERNAL -H ldapi:/// -D "cn=config" -f nis.ldif

6) Set root password.
    6.1)Create a file 'passwd.ldif' with the following entries.
       dn: olcDatabase={2}hdb,cn=config
       changetype: modify
       replace: olcRootPW
       olcRootPW: secret

    6.2) Make entry
[root@oserver1 ~]# ldapmodify -Y EXTERNAL -H ldapi:/// -f passwd.ldif

7) Add base domain entry.
   7.1)Create a file 'base.ldif' with the following entries.
       dn: dc=my-domain,dc=com
       dc: my-domain
       objectClass: top
       objectClass: domain

       dn: ou=People,dc=my-domain,dc=com
       ou: People
       objectClass: top
       objectClass: organizationalUnit

       dn: ou=Group,dc=my-domain,dc=com
       ou: Group
       objectClass: top
       objectClass: organizationalUnit

    7.2) Add the entry.
[root@oserver1 ~]# ldapadd -x -D "cn=Manager,dc=my-domain,dc=com" -f base.ldif -w secret

8) Convert '/etc/passwd', '/etc/group' into ldif format and add to ldap database.
[root@oserver1 ~]# cd /usr/share/migrationtools
[root@oserver1 migrationtools]# grep ":10[0-9][0-9]" /etc/passwd > passwd
[root@oserver1 migrationtools]# ./migrate_passwd.pl  passwd users.ldif
[root@oserver1 migrationtools]# ldapadd -x -D "cn=Manager,dc=my-domain,dc=com" -f users.ldif -w secret

[root@oserver1 migrationtools]# grep ":10[0-9][0-9]" /etc/group > group
[root@oserver1 migrationtools]# ./migrate_group.pl  group groups.ldif
[root@oserver1 migrationtools]# ldapadd -x -D "cn=Manager,dc=my-domain,dc=com" -f groups.ldif -w secret
[root@oserver1 migrationtools]# cd

9) Open Firewall
[root@oserver1 ~]# firewall-cmd --zone=public --add-service=ldap --permanent
[root@oserver1 ~]# firewall-cmd --reload

10) Create Server Certificate. Follow the following steps:
    10.1) Create a local Certificate Authority (CA).
[root@oserver1 ~]# /etc/pki/tls/misc/CA  -newca

    10.2) Create public-private key pair
[root@oserver1 ~]#  openssl genrsa -out ldapserver.key

    10.3) Create a certificate signing request (CSR)
[root@oserver1 ~]# openssl req -new -key ldapserver.key -out ldapserver.csr

    10.4) Sign the certificate with the local CA.
[root@oserver1 ~]# openssl ca -in ldapserver.csr -out ldapserver.crt

   10.5) Copy the files 'ldapserver.key' and 'ldapserver.crt' to the dir. '/etc/openldap/certs/'

   10.6) We have to copy the CA cert file '/etc/pki/CA/cacert.pem' to the dir '/etc/openldap/cacerts/' on every client machine.

    10.7)Create a file 'cert.ldif' with the following entries.
          dn: cn=config
          changetype: modify
          replace: olcTLSCertificateFile
          olcTLSCertificateFile: /etc/openldap/certs/ldapserver.crt

          dn: cn=config
          changetype: modify
          replace: olcTLSCertificateKeyFile
          olcTLSCertificateKeyFile: /etc/openldap/certs/ldapserver.key


     10.8) Make entry
[root@oserver1 ~]# ldapmodify -Y EXTERNAL -H ldapi:/// -f cert.ldif

11) Configure logging.
    11.1) Edit the file '/etc/rsyslog.conf' and add the following entry.
              local4.*                    /var/log/ldap.log

    11.2) Restart rsyslog
[root@oserver1 ~]# systemctl restart rsyslog  

12) Restart the server.
[root@oserver1 ~]# systemctl restart slapd

13) Test the server
[root@oserver1 ~]# ldapsearch -x '(uid=*)' 


Configure Client for LDAP Authentication


We use the System Security Services Daemon (SSSD)  for user information services and authentication, instead of  the  legacy services.

We use the authconfig tool for authentication configuration.
 If --test action is specified, the authconfig just  reads  the  current settings  from the various configuration files and prints their values. If --update action is specified, authconfig must be  run  by  root, and configuration changes are saved.

Each  --enable has a matching --disable option that disables the service if it  is  already  enabled.      

Perform the following steps on the client machine:

1) Install Packages.
[root@meru ~]#    yum -y install openldap-clients authconfig sssd*

2) Configure authentication using 'authconfig'.
[root@meru ~]#    authconfig --enableldap --enableldapauth --ldapserver="ldap://oserver1.mycompany.com:389"  --ldapbasedn="dc=my-domain,dc=com" --passalgo=sha512 --enableldaptls  --enablemkhomedir  --update


Where,
--enableldap -> Use LDAP as an Identity Store. Configures user information services in /etc/nsswitch.conf. 

--enableldapauth -> Use LDAP as the Authentication method. Configures  authentication functions  via  /etc/pam.d/system-auth.

--ldapserver="ldap://oserver1.mycompany.com:389" -> The URL of the LDAP Server. This usually requires both the host name and port number of the LDAP server.

--ldapbasedn="dc=my-domain,dc=com" -> gives the root suffix or distinguished name (DN) for the user directory. All of the user entries used for identity/authentication will exist below this parent entry.

--enableldaptls -> sets whether to use Start TLS to encrypt the connections to the LDAP server. This enables a secure connection over a standard port. We will later retrieve the issuing CA certificate for the LDAP server and configure it in 'sssd'.

--passalgo=sha512 -> The algorithm used for storing password hashes.

--enablemkhomedir -> Create home directory on first login


3) Verify the settings.
[root@meru ~]# authconfig --test


4) Install C.A. Certificate
    3.1) Copy C.A. Certificate 'cacert.pem' from the server to the dir '/etc/openldap/cacerts/'

    3.2) Edit the file '/etc/sssd/sssd.conf' and add the following entry
           ldap_tls_cacert = /etc/openldap/cacerts/cacert.pem

    3.3) Restart sssd
[root@meru ~]# systemctl restart sssd

    3.4) Edit the file '/etc/openldap/ldap.conf' and add the following entry
           TLS_CACERT = /etc/openldap/cacerts/cacert.pem

5) Test the connection. Consider user 'shabbir'. Comment the entry for user 'shabbir' in '/etc/passwd' if it exists. Then execute the below command.

root@meru ~]#  getent passwd shabbir
shabbir:*:1000:1000:shabbir:/home/shabbir:/bin/bash

[root@meru ~]# ldapsearch -x '(uid=shabbir)'   


6) Log in into the machine as user 'shabbir' and password as given  in the LDAP database.